
文档切分节点
本文档详细介绍知识库导入流程中的文档切分节点(DocumentSplitNode),该节点负责将 Markdown 文档按标题结构切分为语义完整的文本块(Chunks),支持超长章节的二次切分和短内容的智能合并。
学习理念:文档切分是 RAG 系统的"地基"——切片质量直接决定检索质量。太粗 → 检索不精确,太细 → 语义碎片化。 DocumentSplitNode 的核心思路是"保持语义边界":按 Markdown 标题自然切分,超长章节二次拆解(段落→句子),过短片段合并。这套切分策略在大模型知识库项目中是通用模板。
海外对标:DocumentSplitNode 的"按 Markdown 标题结构切分 + 代码围栏检测 + 装箱算法"对标 LlamaIndex 的
MarkdownNodeParser、LangChain 的MarkdownHeaderTextSplitter、以及 Unstructured.io 的文档分割方案。代码围栏状态机设计对标 OpenAI Cookbook 中推荐的 Markdown 解析最佳实践。
本节 AI 替代率:~85% | 人工干预率:~15%
| 角色 | 能力范围 |
|---|---|
| 🤖 AI 擅长 | 生成切分代码骨架、正则表达式编写、装箱算法实现、句子切分模式、JSON 备份逻辑 |
| 👤 人类需理解 | 切分策略的工程决策(max_length / min_length 的取值依据)、代码围栏检测的边界情况、合并策略的语义合理性判断 |
阅读指引
| 颜色 | 章节 | AI 替代率 | 人工干预 | 说明 |
|---|---|---|---|---|
| 🟡 | §1 任务目标 | ~95% | ~5% | 学习目标明确 |
| 🟢 | §2 核心概念扫盲 | ~95% | ~5% | 标题解析 / 代码围栏 / 装箱算法 / 句子切分,都是标准技术 |
| 🟡 | §3 整体流程 | ~90% | ~10% | 理解数据流转流程即可 |
| 🔴 | §4 分步实现 | ~75% | ~25% | 7 步流程中 Step 4a(二次切分)+Step 4b(合并)逻辑较复杂 |
| 🟢 | §4.4 主代码 | ~80% | ~20% | DocumentSplitNode 整体架构,核心在 _split_and_merge |
| 🟢 | §5 测试运行 | ~95% | ~5% | 看预期输出即可 |
| 🟡 | §6 总结 | ~90% | ~10% | 设计要点回顾 |
技术栈健康度标签体系
| 技术 | 健康度 | 建议 |
|---|---|---|
| LangGraph | ⏳ 成长期 | DocumentSplitNode 作为 LangGraph 节点运行,API 仍在迭代中。 |
| re (正则表达式) | 🟢 稳定 | Python 标准库,文档切分的核心依赖(标题匹配 + 代码围栏检测 + 句子切分)。 |
| Markdown 标题切分 | 🟢 稳定 | RAG 系统中文档切分的经典策略。LangChain MarkdownHeaderTextSplitter 与 LlamaIndex MarkdownNodeParser 都采用类似方案。 |
| Bin Packing 算法 | 🟢 稳定 | 经典的装箱问题算法,在文档切分中用于最大化利用切片空间。不是新概念,但在 AI 项目中找到了新应用场景。 |
| json.dump 备份 | 🔥 巅峰 | Python 标准输出格式,AI 项目调试和追溯的通用手段。 |
体系说明:🟢🟡🟠🔴 标识学习优先级 / AI 替代率;🔥🟢⏳⚠️💀 标识技术栈健康度。
中英文对照表
| English | 中文 | 本质 |
|---|---|---|
| Document Split | 文档切分 | 将长文档按语义边界切分为多个可检索的文本块 |
| Chunk | 切片/文本块 | 检索的最小单元,包含标题 + 内容 |
| Code Fence | 代码围栏 | Markdown 中包裹代码块的 ``` 或 ~~~ |
| Bin Packing | 装箱算法 | 将小物品装进固定容量的箱子,最小化箱子数 |
| Sentence Boundary | 句子边界 | 句子结束的标点(。!?;.!?;) |
| Lookbehind Assertion | 后瞻断言 | 正则表达式的一种零宽断言,匹配"前面是指定字符"的位置 |
| Parent Title | 父标题 | 二次切分后,子片段所属的原始章节标题 |
| Flush | 刷新/落盘 | 将当前缓冲区的内容保存并清空 |
💡 程序员比喻
- DocumentSplitNode 就像
git log的按 commit 分组——每个 Markdown 标题就是一个 commit,正文就是 diff,超长 commit 要拆分。- 代码围栏检测 就像
.gitignore——有些模式(#注释)在特定上下文(代码块内)不应该被匹配。- 装箱算法 就像 Docker 的
layer caching——把内容"打包"进有限的空间,能装下就装,装不下就开新包。- 句子边界拆分 就像
awk -F指定分隔符——用正则把文本拆成数组。- 二次切分 + 合并 就像 Git 的
commit --amend——太大了要拆(git reset),太小了要合(squash)。
1. 任务目标
1.1 本章目标
通过本章学习,你将掌握:
- 文档切分原理:理解 RAG 系统中文档分块的重要性和策略
- Markdown 解析:学会使用正则表达式解析 Markdown 标题结构
- 代码围栏检测:避免将代码块中的
#误识别为标题 - 分层切分策略:掌握 段落 → 句子 的逐级切分方法
- 装箱算法:理解文本装箱(Bin Packing)的实现思路
- 智能合并:学会合并过短的相邻片段以提高检索质量
1.2 涉及文件
knowledge/processor/import_process/nodes/
└── document_split.py # 文档切分节点(本章重点)1.3 节点在流程中的位置
.jpg)
2. 核心概念扫盲
2.1 为什么需要文档切分?
RAG(检索增强生成) 系统的核心流程:
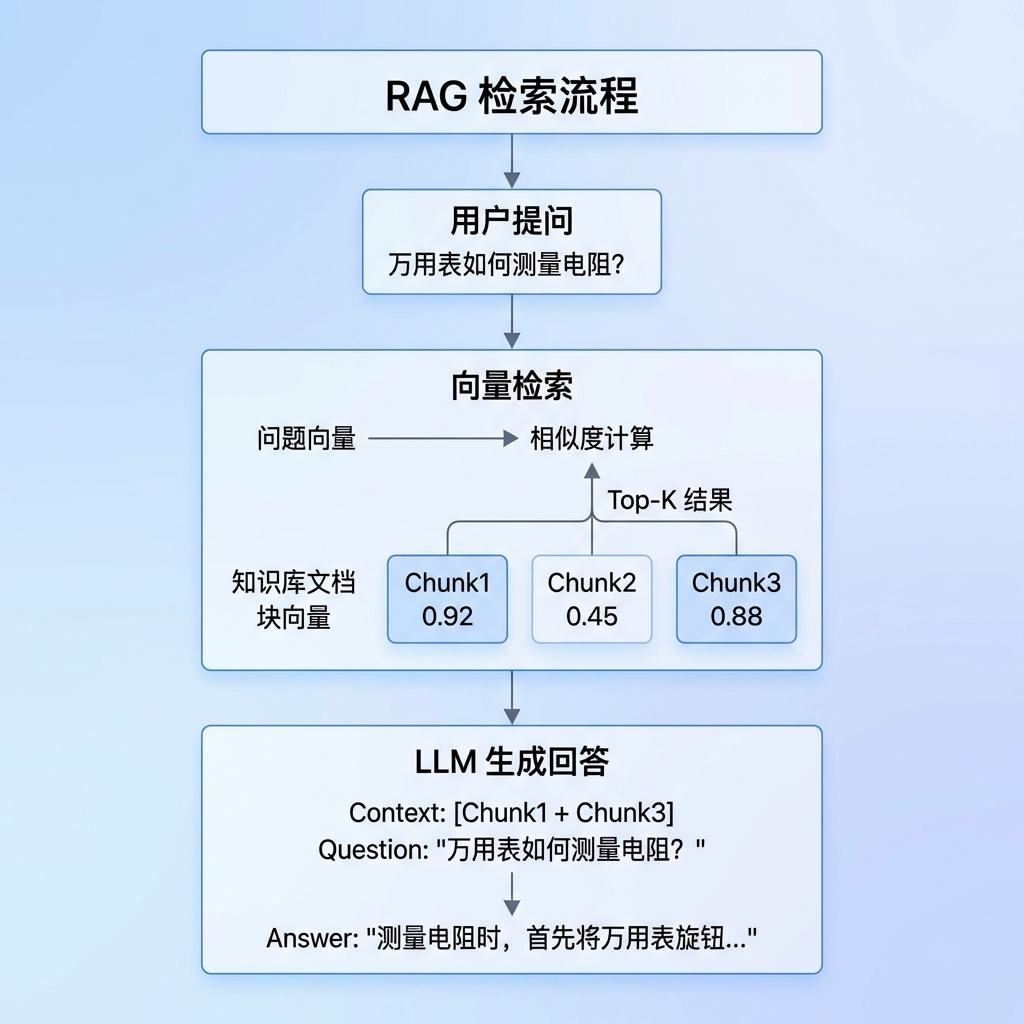
切分的重要性:
| 切分粒度 | 优点 | 缺点 |
|---|---|---|
| 太大 | 上下文完整 | 检索不精确,噪声多 |
| 太小 | 检索精确 | 上下文碎片化,语义不完整 |
| 适中 | 平衡精确度和完整性 | 需要智能切分策略 |
本节点的切分策略:
- 按 Markdown 标题自然切分(保持语义完整)
- 超长章节二次切分(控制向量化成本)
- 过短片段合并(避免信息碎片化)
2.2 Markdown 标题语法
标题层级:
# 一级标题 (H1)
## 二级标题 (H2)
### 三级标题 (H3)
#### 四级标题 (H4)
##### 五级标题 (H5)
###### 六级标题 (H6)正则表达式匹配:
🟢 【P2 后面可以查】 正则表达式是标准文本工具,
^\s*#{1,6}\s+.+的写法可在需要时查阅文档。重点理解代码围栏检测的设计思路。
import re

# 匹配 1-6 级标题
heading_re = re.compile(r"^\s*#{1,6}\s+.+")

# 示例
lines = [
    "# 第一章",           # ✓ 匹配
    "## 1.1 概述",        # ✓ 匹配
    "  ### 缩进标题",     # ✓ 匹配(允许前导空格)
    "正文内容",           # ✗ 不匹配
    "#标签",              # ✗ 不匹配(# 后需要空格)
    "####### 七级",       # ✗ 不匹配(最多6级)
]

for line in lines:
    if heading_re.match(line):
print(f"标题: {line}")正则解析:
^\s*#{1,6}\s+.+
│ │  │    │  │
│ │  │    │  └── .+ : 至少一个任意字符(标题文本)
│ │  │    └── \s+ : 至少一个空白字符
│ │  └── #{1,6} : 1到6个 # 符号
│ └── \s* : 零个或多个前导空白
└── ^ : 行首2.3 代码围栏检测
问题: 代码块内的 # 不应被识别为标题
## 真正的标题
下面是一段 Python 代码:
```python
# 这是注释,不是标题
def foo():
pass代码说明
🟡 【P1 看注释就行】 代码围栏检测用状态机实现——简洁的
in_fence = not in_fence开关逻辑。这是避免代码块内#被误识别为标题的关键。
**解决方案:** 使用状态机追踪代码围栏
```python
in_fence = False # 是否在代码块内
for line in lines:
# 检测代码围栏边界(``` 或 ~~~)
if line.strip().startswith("```") or line.strip().startswith("~~~"):
in_fence = not in_fence # 切换状态
# 只有不在代码块内时才识别标题
is_heading = (not in_fence) and heading_re.match(line)状态转换图:
           ┌────────────────┐
           │   in_fence     │
           │   = False      │
           └───────┬────────┘
                   │
        遇到 ``` ──┼── 遇到 ```
                   │
           ┌───────▼────────┐
           │   in_fence     │
           │   = True       │
└────────────────┘2.4 文本装箱算法
概念: 将多个小物品装入固定容量的箱子,尽量减少箱子数量。
在文档切分中的应用:
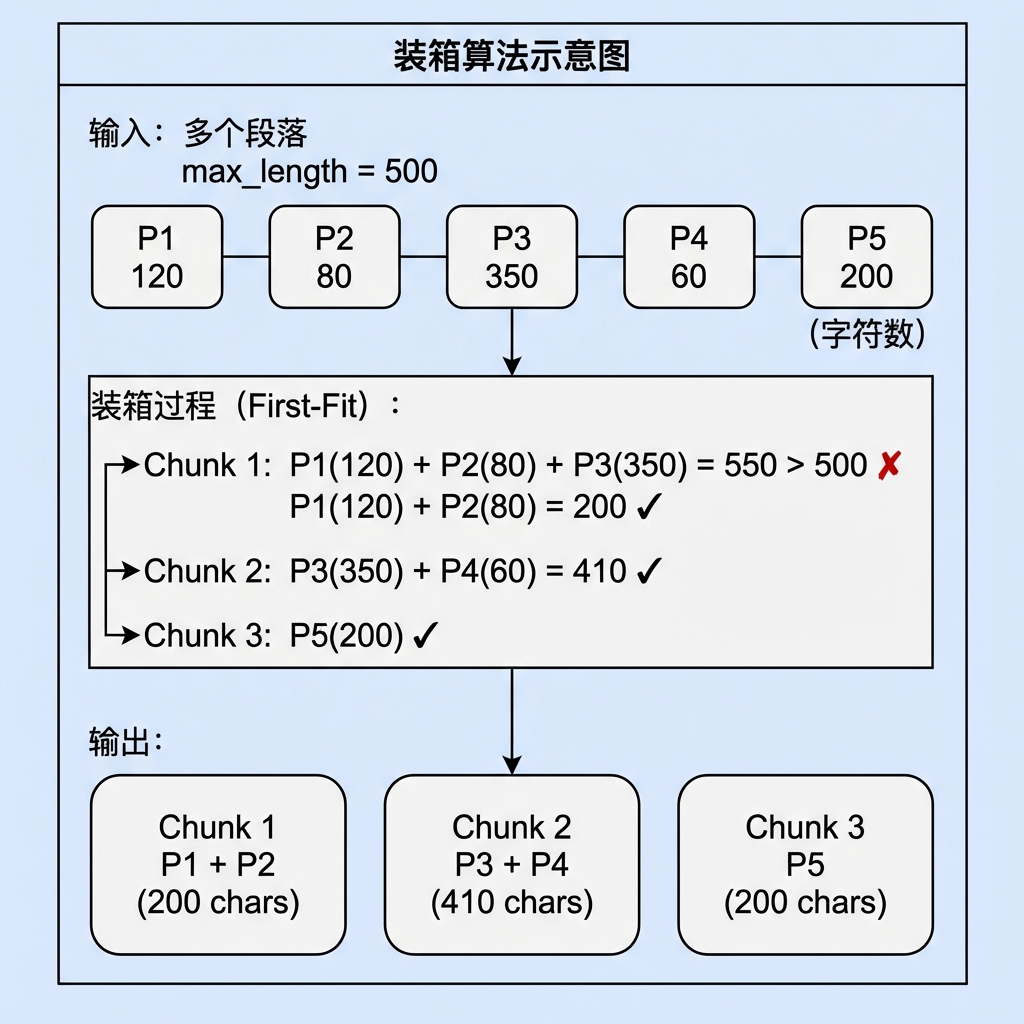
Python 实现思路:
🟡 【P1 看注释就行】 装箱算法的经典实现——遍历段落,能装下就 append,装不下就开新箱。这段代码是工具方法级别的认知,可直接复制复用。
def pack_paragraphs(paragraphs: List[str], max_length: int) -> List[str]:
    """将段落装箱到多个 chunk 中"""
    chunks = []
    current_chunk = ""

    for para in paragraphs:
        # 计算加入当前段落后的长度
        new_length = len(current_chunk) + len(para) + 2  # +2 for "\n\n"

        if new_length <= max_length:
            # 可以装入当前箱子
            current_chunk += ("\n\n" if current_chunk else "") + para
        else:
            # 当前箱子已满,开启新箱子
            if current_chunk:
                chunks.append(current_chunk)
            current_chunk = para

    # 处理最后一个箱子
    if current_chunk:
        chunks.append(current_chunk)

return chunks2.5 句子切分
句子边界标点:
🟢 【P2 后面可以查】 基于正则的句子切分,
(?<=[。!?;.!?;])是后瞻断言。需要时查文档即可。
# 中英文句子结束标点
sentence_pattern = r"(?<=[。!?;.!?;])\s*"

text = "这是第一句。这是第二句!第三句?"
sentences = re.split(sentence_pattern, text)
# ['这是第一句', '这是第二句', '第三句', '']正则解析:
(?<=[。!?;.!?;])\s*
│                  │
│                  └── \s* : 零个或多个空白字符
└── (?<=...) : 正向后瞻断言(匹配前面是指定字符的位置)3. 文档切分业务处理流程(总)
3.1 整体流程概述
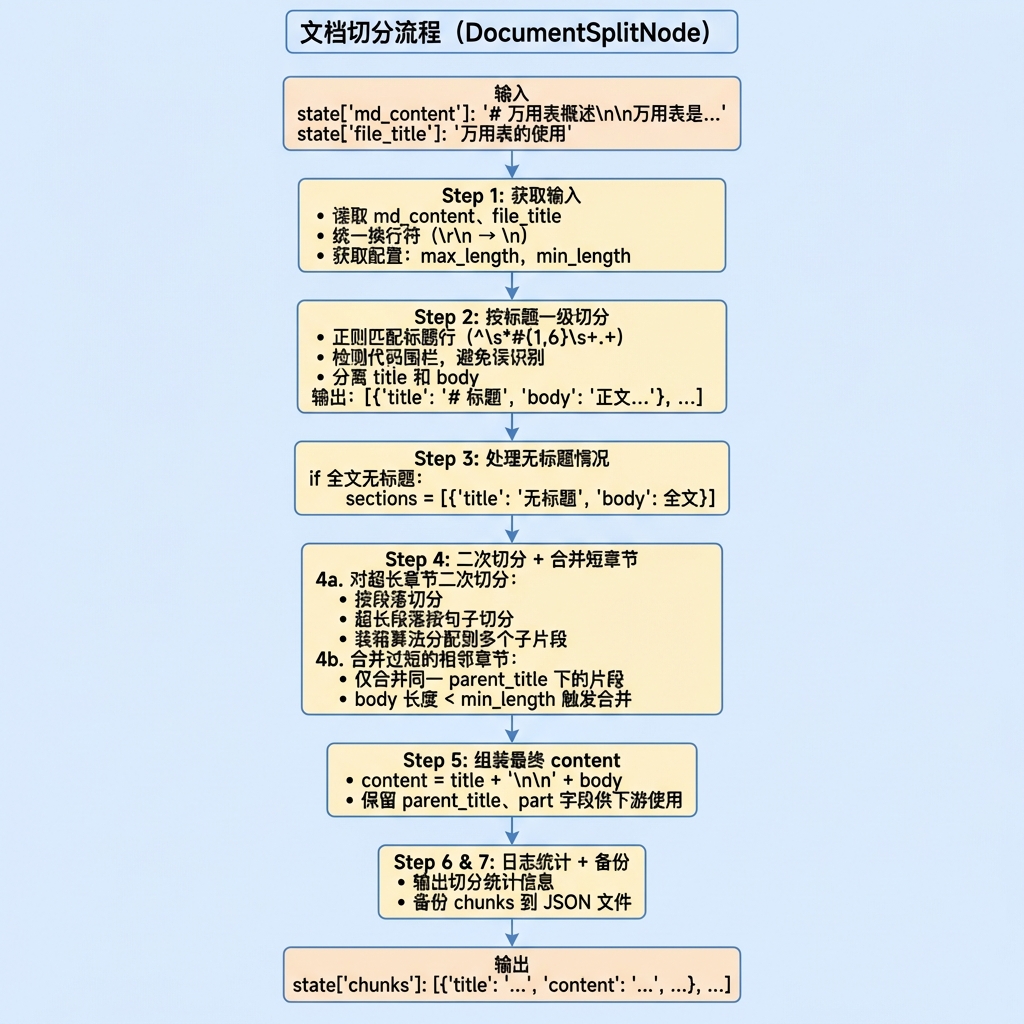
3.2 数据流转
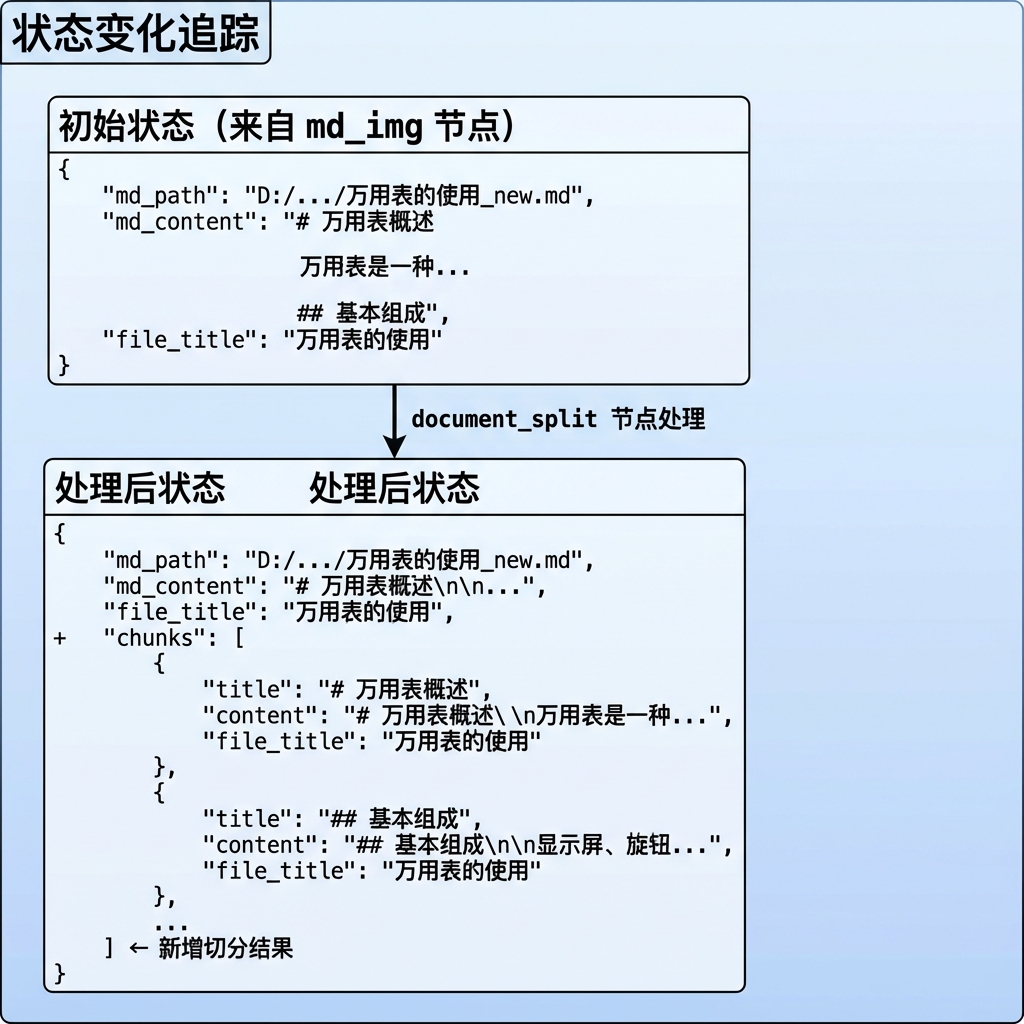
3.3 切分策略示意图
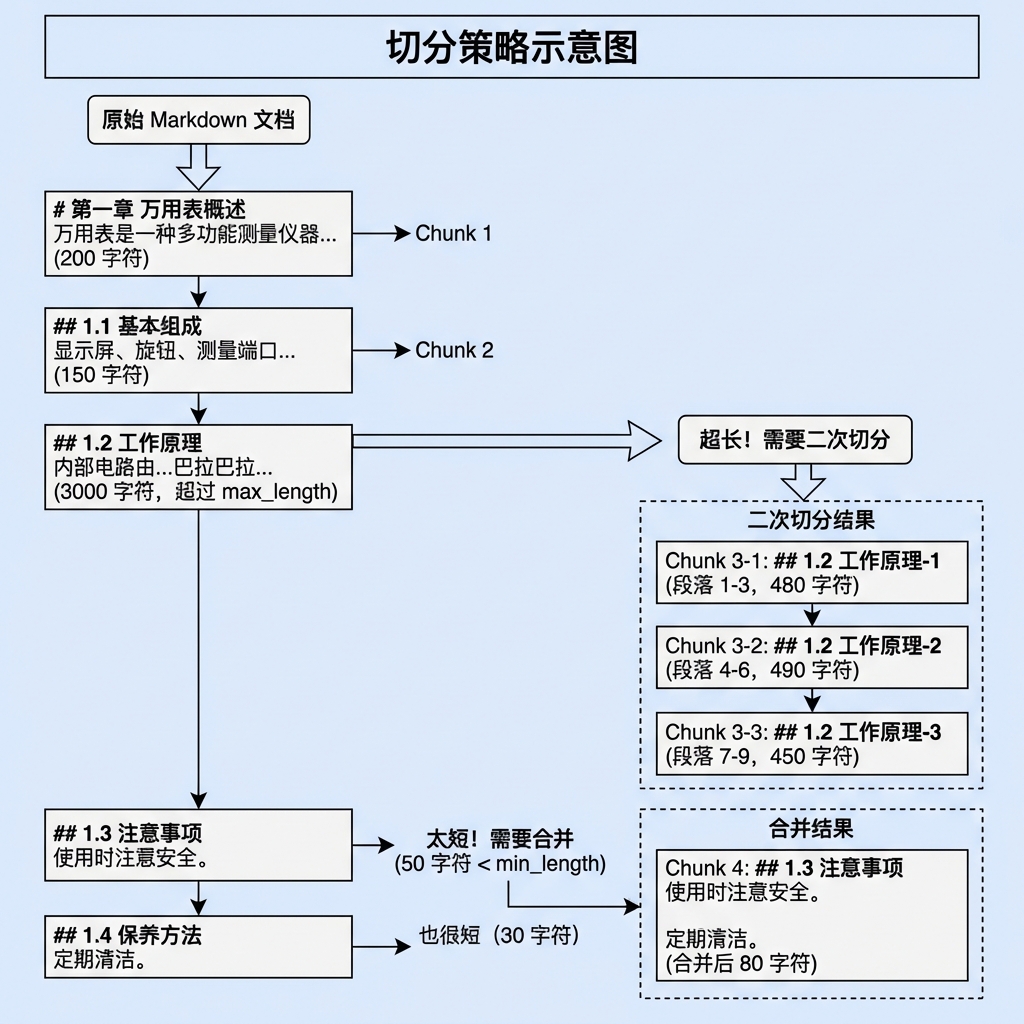
4. 文档切分业务处理流程(分)
4.1 目标
- 按 Markdown 标题结构将文档切分为语义完整的文本块
- 控制每个文本块的长度在合理范围内(不超过 max_length)
- 避免产生过短的碎片化文本块(小于 min_length 时合并)
- 保留标题与正文的结构关系,便于后续检索和展示
4.2 需求分析
输入:
md_content:Markdown 文档内容file_title:文件标题(用于标记来源)
输出:
chunks:切分后的文本块列表,每个 chunk 包含:title:章节标题content:完整内容(标题 + 正文)file_title:来源文件标题parent_title(可选):父标题(二次切分时产生)part(可选):片段编号(二次切分时产生)
配置参数:
max_content_length:单个 chunk 的最大字符数(默认 500)min_content_length:触发合并的最小字符数(默认 100)
边界条件:
| 场景 | 处理方式 |
|---|---|
md_content 为空 | 抛出 DocumentSplitError |
| 全文无标题 | 整体作为一个 chunk,标题设为 "无标题" |
| 章节超长 | 按段落→句子逐级二次切分 |
| 章节过短 | 与下一个同父标题的章节合并 |
代码块内有 # | 不识别为标题(代码围栏检测) |
4.3 实现流程
4.3.1 实现流程图
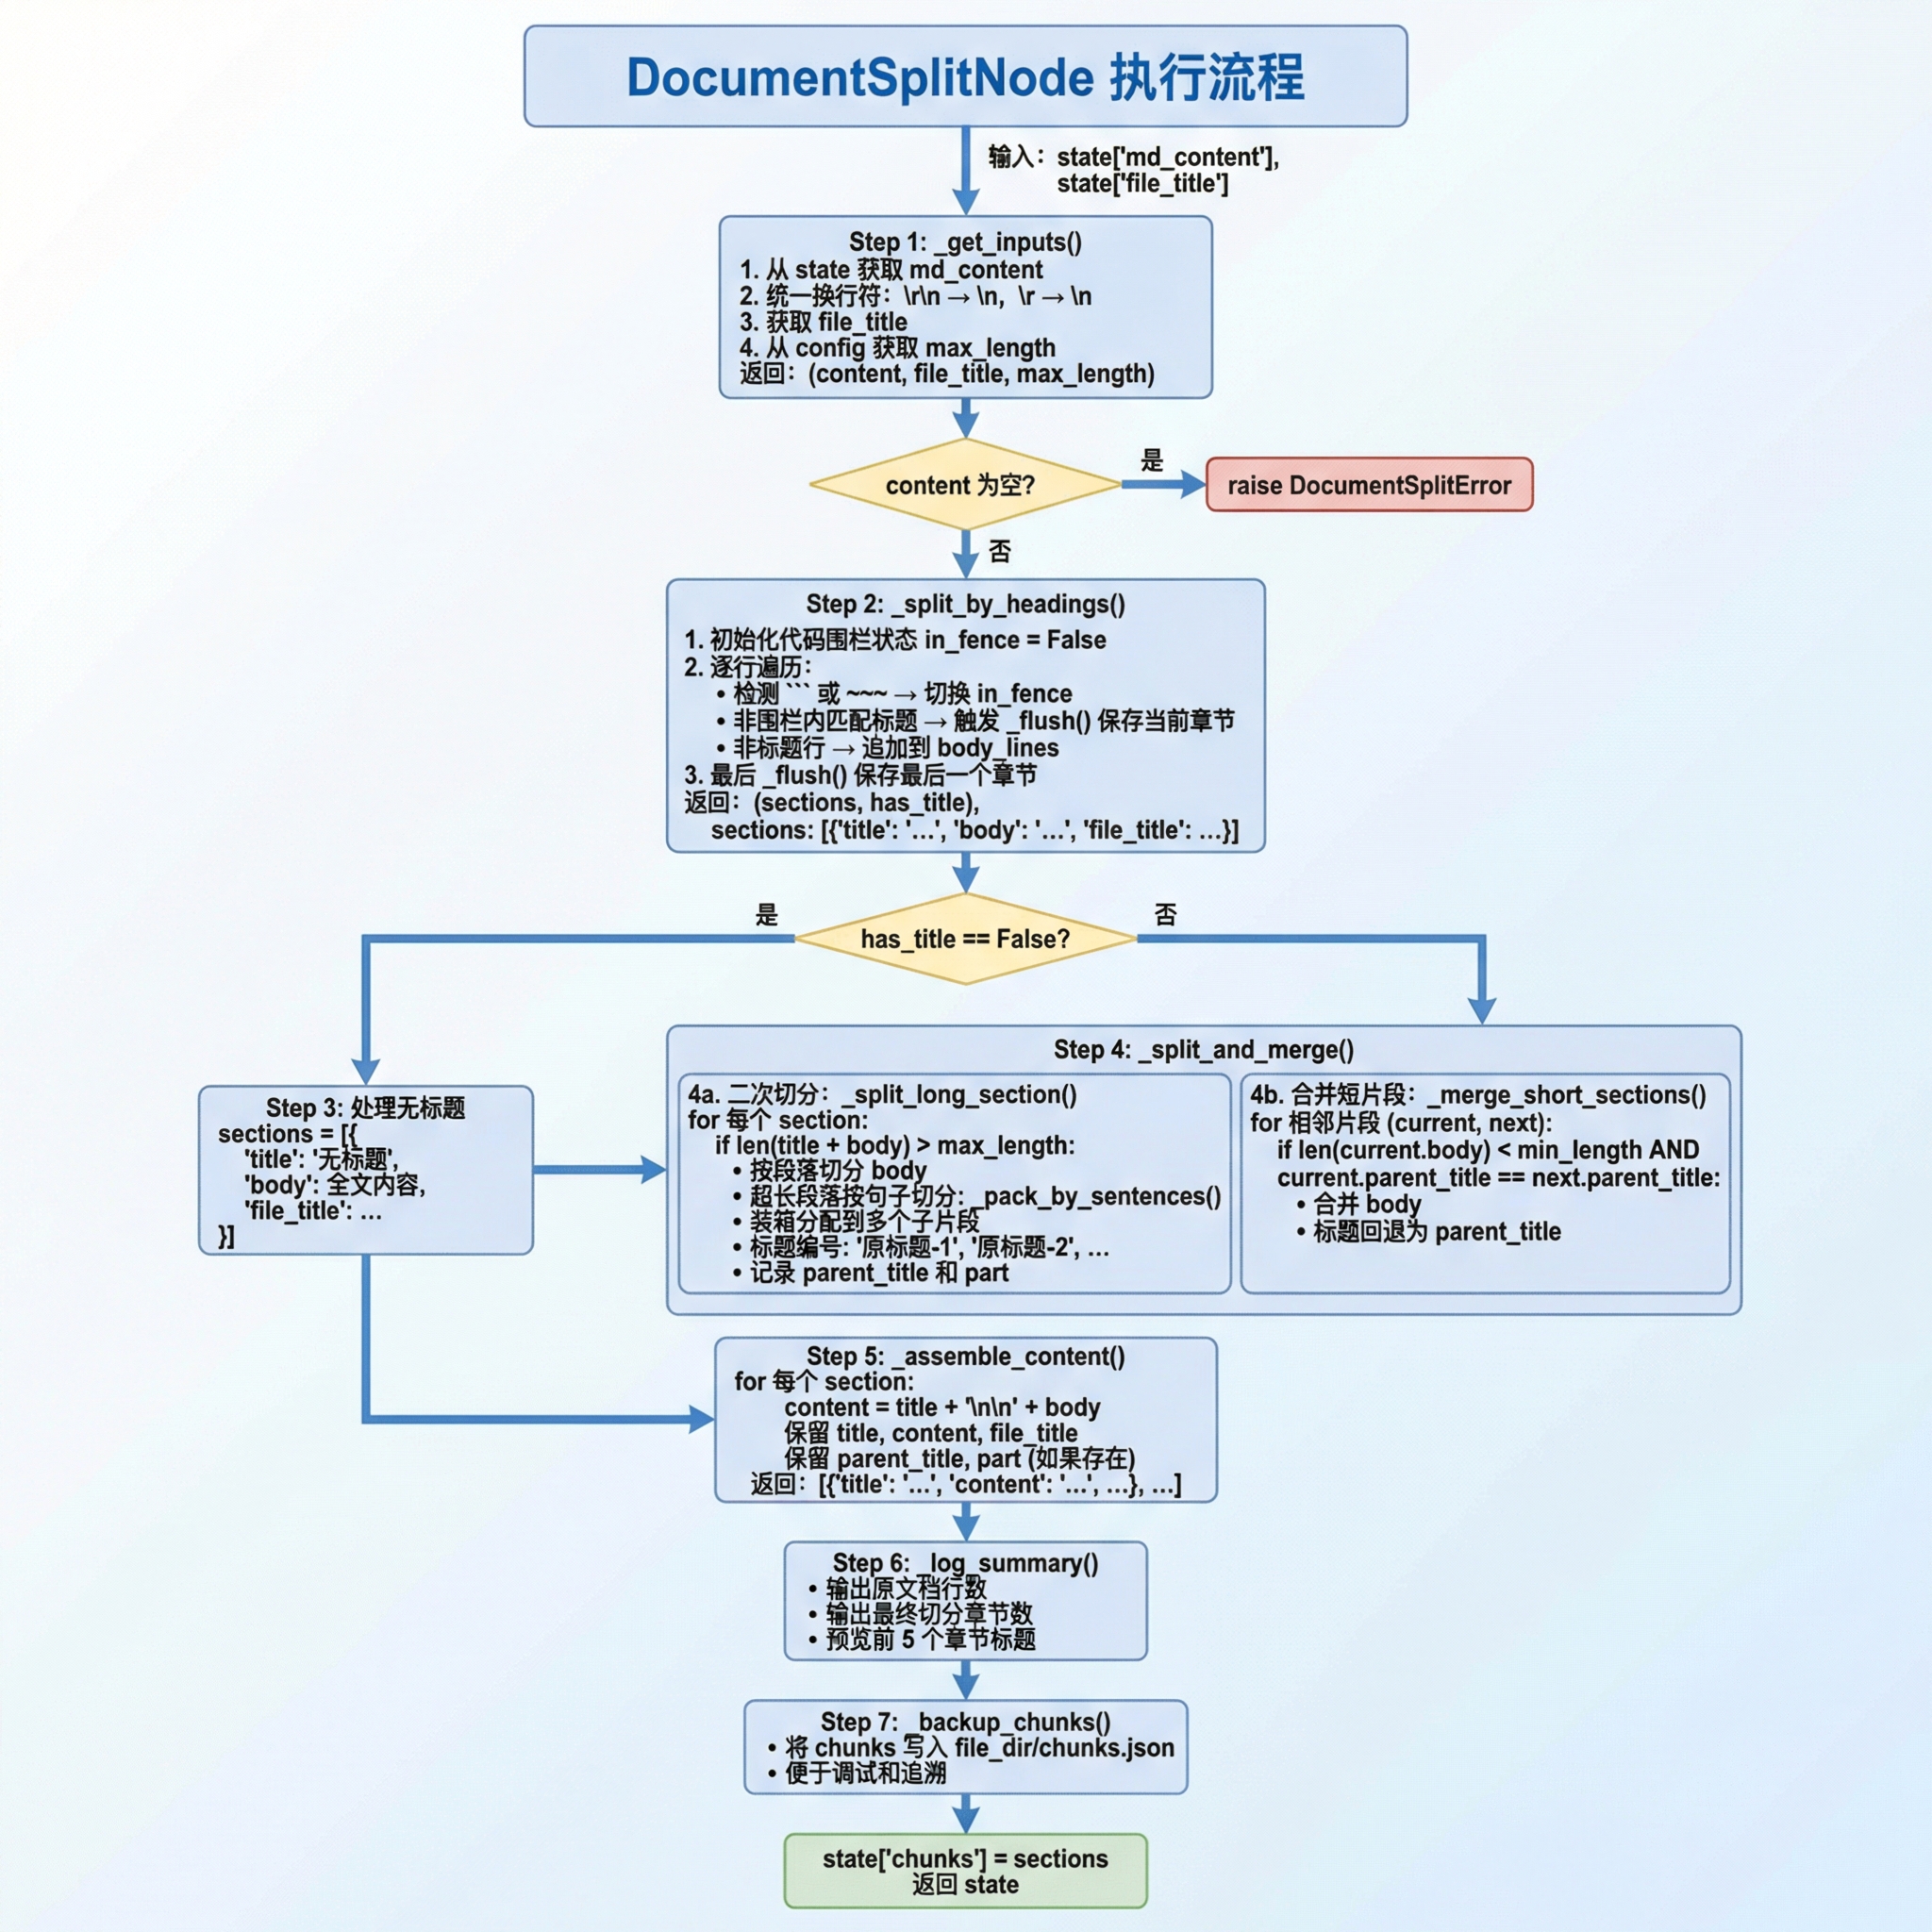
4.3.2 具体实现步骤
Step 1: 获取输入
功能描述: 从状态字典中获取 Markdown 内容和配置参数,统一换行符格式。
实现要点:
获取 md_content
- 从
state.get("md_content", "")获取内容 - 如果内容为空,后续会抛出异常
- 从
统一换行符
- Windows 换行符
\r\n转为\n - Mac 旧版换行符
\r转为\n - 确保后续按行处理时行为一致
- Windows 换行符
获取配置
file_title:来源文件标题max_length:从 config 获取最大切片长度
代码片段:
🟡 【P1 看注释就行】 Step 1 代码模式固定——从 state 取值 → 统一换行符 → 返回。理解
\r\n → \n的跨平台处理即可。
def _get_inputs(self, state, config):
    content = state.get("md_content", "")
    if content:
        content = content.replace("\r\n", "\n").replace("\r", "\n")

    file_title = state.get("file_title", "")
    max_length = config.max_content_length

return content, file_title, max_lengthStep 2: 按标题一级切分
功能描述: 按 Markdown 标题行将文档切分为多个 section,每个 section 包含 title 和 body。
实现要点:
编译标题正则
pythonheading_re = re.compile(r"^\s*#{1,6}\s+.+")初始化状态变量
sections: 存储切分结果current_title: 当前章节标题body_lines: 当前章节正文行列表has_title: 标记文档是否有标题in_fence: 是否在代码围栏内
定义内部函数
_flush()- 将当前积累的 title 和 body 保存为一个 section
- 清空 body_lines 准备下一个章节
逐行遍历
🟡 【P1 看注释就行】 Step 2 的标题切分核心逻辑——
_flush()保存当前 section + 检测新标题。in_fence状态机是精髓,必须理解。
for line in lines:
    # 检测代码围栏
    if line.strip().startswith("```") or line.strip().startswith("~~~"):
        in_fence = not in_fence

    # 判断是否为标题
    is_heading = (not in_fence) and heading_re.match(line)

    if is_heading:
        has_title = True
        _flush()  # 保存上一个章节
        current_title = line.strip()
        body_lines = []
    else:
body_lines.append(line)最后调用
_flush()- 保存最后一个章节
输出格式:
🟢 【P2 后面可以查】 输出格式示例,理解 section 的数据结构(title + body + file_title)即可。
sections = [
    {"title": "# 第一章", "body": "正文内容...", "file_title": "万用表"},
    {"title": "## 1.1 概述", "body": "...", "file_title": "万用表"},
    ...
]Step 3: 处理无标题情况
功能描述: 如果整个文档没有 Markdown 标题,将全文作为一个 chunk 处理。
实现要点:
🟡 【P1 看注释就行】 无标题情况处理代码很简单——判断
has_title→ 构造默认 section。
if not has_title:
    sections = [{
        "title": "无标题",
        "body": content,
        "file_title": file_title
    }]
self.logger.info("全文无标题,作为单个 chunk 处理")触发条件:
- 文档中不存在任何
#开头的标题行 - 常见于纯文本文档或格式不规范的文档
Step 4a: 二次切分超长章节
功能描述: 对超过 max_length 的章节进行二次切分,按段落和句子逐级拆分。
实现要点:
判断是否需要切分
pythontitle_prefix = f"{title}\n\n" if title else "" total = len(title_prefix) + len(body) if total <= max_length: return [section] # 无需切分计算可用空间
🟡 【P1 看注释就行】 段落切分 + 装箱的完整实现。注意
_pack_by_sentences的调用时机(单段落超长时)。
available = max_length - len(title_prefix)按段落切分 body
pythonparagraphs = [p.strip() for p in re.split(r"\n\s*\n", body) if p.strip()]装箱算法分配段落
🟡 【P1 看注释就行】 合并逻辑——
cur_body_len < min_length && same_parent时合并。注意只合并同一 parent_title 下的片段,防止跨章节混合。
pieces = []
buf = ""

for para in paragraphs:
    if len(para) > available:
        # 单段落超长,按句子切分
        if buf:
            pieces.append(buf)
            buf = ""
        pieces.extend(self._pack_by_sentences(para, available))
    else:
        # 正常段落拼接
        new_len = len(buf) + 2 + len(para)
        if new_len <= available:
            buf += ("\n\n" if buf else "") + para
        else:
            pieces.append(buf)
buf = para- 生成子片段
🟡 【P1 看注释就行】 组装 content 的代码模式固定——
title + \n\n + body,保留parent_title/part字段供下游。
return [
    {
        "title": f"{title}-{i+1}",
        "body": piece,
        "file_title": file_title,
        "parent_title": title,  # 记录父标题
        "part": i + 1           # 记录片段编号
    }
    for i, piece in enumerate(pieces)
]Step 4b: 合并过短章节
功能描述: 合并 body 长度小于 min_length 的相邻片段,避免信息碎片化。
合并条件:
- 当前片段 body 长度 < min_length
- 当前片段与下一个片段拥有相同的 parent_title
实现要点:
🟢 【P2 后面可以查】 JSON 备份代码固定——
os.makedirs + json.dump。
merged = []
current = sections[0]

for next_sec in sections[1:]:
    cur_body_len = len(current.get("body", ""))
    same_parent = (
        current.get("parent_title") and
        current["parent_title"] == next_sec.get("parent_title")
    )

    if cur_body_len < min_length and same_parent:
        # 合并: 将 next_sec 的 body 追加到 current
        current["body"] = current["body"] + "\n\n" + next_sec["body"]
        # 标题回退为父标题
        current["title"] = current.get("parent_title", current["title"])
    else:
        merged.append(current)
        current = next_sec

merged.append(current)为什么只合并同一 parent_title 下的片段?
- 不同原始章节的内容不应混合
- 保持语义边界清晰
Step 5: 组装最终
功能描述: 将分离的 title 和 body 组装为最终的 content 字段。
实现要点:
🔥 【P0 必须要学】 DocumentSplitNode 是整个 RAG 检索质量的"守门员"。重点理解:
_split_by_headings的标题检测 + 代码围栏状态机、_split_and_merge的分层切分策略、_merge_short_sections的智能合并约束。切片策略(max_length / min_length)的调整直接影响检索效果。
for sec in sections:
    title = sec.get("title", "")
    body = sec.get("body", "")

    # 组装 content
    if title and body:
        content = f"{title}\n\n{body}"
    else:
        content = title or body

    chunk = {
        "title": title,
        "content": content.strip(),
        "file_title": sec.get("file_title", ""),
    }

    # 保留二次切分产生的字段
    if "parent_title" in sec:
        chunk["parent_title"] = sec["parent_title"]
    if "part" in sec:
        chunk["part"] = sec["part"]

result.append(chunk)为什么分离 title 和 body?
- title 在二次切分时需要添加编号后缀
- 便于计算 body 长度时排除 title 的影响
- 最终合并时保持格式一致
Step 6: 日志统计
功能描述: 输出切分统计信息,便于调试和监控。
输出内容:
- 原文档行数
- 最终切分章节数
- 最大切片长度
- 前 5 个章节标题预览
Step 7: 备份切片
功能描述: 将切分结果备份到 JSON 文件,便于调试和追溯。
实现要点:
🟢 【P2 后面可以查】 测试代码量大但模式固定——mock MD 内容 → 运行切分 → 检查 chunks 数量。看预期输出即可。
output_path = os.path.join(file_dir, "chunks.json")
with open(output_path, "w", encoding="utf-8") as f:
json.dump(sections, f, ensure_ascii=False, indent=2)4.4 代码实现
# knowledge/processor/import_process/nodes/document_split.py

"""
文档切分节点

按 Markdown 标题切分文档,支持二次切分和短内容合并
"""

import re
import os
import json
from typing import List, Tuple, Optional

from knowledge.processor.import_process.base import BaseNode, setup_logging
from knowledge.processor.import_process.state import ImportGraphState
from knowledge.processor.import_process.config import get_config
from knowledge.processor.import_process.exceptions import DocumentSplitError


class DocumentSplitNode(BaseNode):
    """
    文档切分节点

    处理流程:
    1. 读取 MD 内容
    2. 按 Markdown 标题进行一级切分(title 与 body 分离存储)
    3. 处理无标题情况
    4. 对超长章节进行二次切分
    5. 合并过短的相邻章节
    6. 组装最终 content = title + body
    """

    name = "document_split"

    # ------------------------------------------------------------------ #
    #                           主流程                                     #
    # ------------------------------------------------------------------ #

    def process(self, state: ImportGraphState) -> ImportGraphState:
        config = get_config()

        # Step 1: 获取输入
        content, file_title, max_length = self._get_inputs(state, config)
        if not content:
            raise DocumentSplitError("md_content 为空", node_name=self.name)

        # Step 2: 按标题一级切分
        sections, has_title = self._split_by_headings(content, file_title)

        # Step 3: 处理全文无标题的情况
        if not has_title:
            sections = [{"title": "无标题", "body": content, "file_title": file_title}]
            self.logger.info("全文无标题,作为单个 chunk 处理")

        # Step 4: 二次切分 + 合并短章节
        sections = self._split_and_merge(
            sections, max_length, config.min_content_length
        )

        # Step 5: 组装最终 content(title + body),清理内部字段
        sections = self._assemble_content(sections)

        # Step 6: 日志统计
        self._log_summary(content, sections, max_length)

        # Step 7: 备份
        state["chunks"] = sections
        self._backup_chunks(state, sections)

        return state

    # ------------------------------------------------------------------ #
    #                       Step 1: 获取输入                               #
    # ------------------------------------------------------------------ #

    def _get_inputs(
        self, state: ImportGraphState, config
    ) -> Tuple[Optional[str], Optional[str], int]:
        """获取输入参数并预处理"""
        self.log_step("step_1", "获取输入")

        content = state.get("md_content", "")
        if content:
            # 统一换行符
            content = content.replace("\r\n", "\n").replace("\r", "\n")

        file_title = state.get("file_title", "")
        max_length = config.max_content_length

        return content, file_title, max_length

    # ------------------------------------------------------------------ #
    #                  Step 2: 按标题一级切分                               #
    # ------------------------------------------------------------------ #

    def _split_by_headings(
        self, content: str, file_title: str
    ) -> Tuple[List[dict], bool]:
        """
        按 Markdown 标题行切分,title 与 body 分开存储。

        Returns:
            sections: [{"title": "# xxx", "body": "正文...", "file_title": ...}, ...]
            has_title: 文档中是否存在标题
        """
        self.log_step("step_2", "按标题切分")

        heading_re = re.compile(r"^\s*#{1,6}\s+.+")
        lines = content.split("\n")

        sections: List[dict] = []
        current_title = ""
        body_lines: List[str] = []
        has_title = False
        in_fence = False  # 代码围栏标记

        def _flush():
            """将当前积累的内容保存为一个 section"""
            body = "\n".join(body_lines).strip()
            if current_title or body:
                sections.append({
                    "title": current_title,
                    "body": body,
                    "file_title": file_title,
                })

        for line in lines:
            # 检测代码围栏(``` 或 ~~~)
            if line.strip().startswith("```") or line.strip().startswith("~~~"):
                in_fence = not in_fence

            is_heading = (not in_fence) and heading_re.match(line)

            if is_heading:
                has_title = True
                _flush()
                current_title = line.strip()
                body_lines = []
            else:
                body_lines.append(line)

        _flush()

        return sections, has_title

    # ------------------------------------------------------------------ #
    #                Step 4: 二次切分 + 合并短章节                          #
    # ------------------------------------------------------------------ #

    def _split_and_merge(
        self,
        sections: List[dict],
        max_length: int,
        min_length: int,
    ) -> List[dict]:
        """二次切分超长章节,合并过短章节"""
        self.log_step("step_4", "二次切分和合并")

        if max_length <= 0:
            return sections

        # 4a: 对超长章节做二次切分
        split_result: List[dict] = []
        for section in sections:
            split_result.extend(self._split_long_section(section, max_length))

        # 4b: 合并过短的相邻章节(仅限同一父标题下的子片段)
        return self._merge_short_sections(split_result, min_length)

    def _split_long_section(self, section: dict, max_length: int) -> List[dict]:
        """
        将超长章节按段落 → 句子逐级切分。

        最终每个子片段的 content 长度 = len(title_prefix) + len(body_piece) <= max_length
        """
        title = section.get("title", "")
        body = section.get("body", "")
        file_title = section.get("file_title", "")

        # title 作为前缀会占用一部分空间
        title_prefix = f"{title}\n\n" if title else ""
        total = len(title_prefix) + len(body)

        if total <= max_length:
            return [section]

        available = max_length - len(title_prefix)
        if available <= 0:
            return [section]

        # 按段落切分 body
        paragraphs = [p.strip() for p in re.split(r"\n\s*\n", body) if p.strip()]

        pieces: List[str] = []
        buf = ""

        for para in paragraphs:
            # 单个段落就超长 → 按句子装箱
            if len(para) > available:
                if buf:
                    pieces.append(buf)
                    buf = ""
                pieces.extend(self._pack_by_sentences(para, available))
                continue

            # 正常段落拼接
            new_len = len(buf) + (2 if buf else 0) + len(para)
            if new_len <= available:
                buf += ("\n\n" if buf else "") + para
            else:
                if buf:
                    pieces.append(buf)
                buf = para

        if buf:
            pieces.append(buf)

        # 只有一片,无需编号
        if len(pieces) <= 1:
            return [section]

        # 生成子片段
        return [
            {
                "title": f"{title}-{i + 1}" if title else f"chunk-{i + 1}",
                "body": piece,
                "file_title": file_title,
                "parent_title": title,
                "part": i + 1,
            }
            for i, piece in enumerate(pieces)
        ]

    def _pack_by_sentences(self, para: str, max_len: int) -> List[str]:
        """将一个超长段落按句子边界装箱"""
        sentences = re.split(r"(?<=[。!?;.!?;])\s*", para)
        sentences = [s.strip() for s in sentences if s.strip()]

        chunks: List[str] = []
        buf = ""

        for sent in sentences:
            if len(buf) + len(sent) <= max_len:
                buf += sent
            else:
                if buf:
                    chunks.append(buf)
                buf = sent

        if buf:
            chunks.append(buf)

        return chunks

    def _merge_short_sections(
        self, sections: List[dict], min_length: int
    ) -> List[dict]:
        """
        合并过短的相邻子片段(仅限同一 parent_title 下的片段)。

        合并条件:
        - 当前片段 body 长度 < min_length
        - 当前片段与下一片段拥有相同的 parent_title
        """
        if not sections:
            return []

        merged: List[dict] = []
        current = sections[0]

        for next_sec in sections[1:]:
            cur_body_len = len(current.get("body", ""))
            same_parent = (
                current.get("parent_title")
                and current["parent_title"] == next_sec.get("parent_title")
            )

            if cur_body_len < min_length and same_parent:
                # 合并: 将 next_sec 的 body 追加到 current
                current["body"] = (
                    current.get("body", "").rstrip()
                    + "\n\n"
                    + next_sec.get("body", "").lstrip()
                ).strip()
                # 标题回退为父标题
                current["title"] = current.get("parent_title", current.get("title", ""))
                # 更新 part 编号
                if "part" in next_sec:
                    current["part"] = next_sec["part"]
            else:
                merged.append(current)
                current = next_sec

        merged.append(current)
        return merged

    # ------------------------------------------------------------------ #
    #               Step 5: 组装最终 content                               #
    # ------------------------------------------------------------------ #

    def _assemble_content(self, sections: List[dict]) -> List[dict]:
        """
        将 title + body 组装为最终的 content 字段,
        清理内部临时字段 body,保留 parent_title 和 part 供下游使用。
        """
        self.log_step("step_5", "组装 content")

        result: List[dict] = []
        for sec in sections:
            title = sec.get("title", "")
            body = sec.get("body", "")

            # 组装: title 在最前面,body 紧随其后
            if title and body:
                content = f"{title}\n\n{body}"
            else:
                content = title or body

            chunk = {
                "title": title,
                "content": content.strip(),
                "file_title": sec.get("file_title", ""),
            }

            # 保留二次切分产生的字段,供下游合并/溯源使用
            if "parent_title" in sec:
                chunk["parent_title"] = sec["parent_title"]
            if "part" in sec:
                chunk["part"] = sec["part"]

            result.append(chunk)

        return result

    # ------------------------------------------------------------------ #
    #                       日志 & 备份                                    #
    # ------------------------------------------------------------------ #

    def _log_summary(self, raw_content: str, sections: List[dict], max_length: int):
        """输出切分统计信息"""
        self.log_step("step_6", "输出统计")

        lines_count = raw_content.count("\n") + 1
        self.logger.info(f"原文档行数: {lines_count}")
        self.logger.info(f"最终切分章节数: {len(sections)}")
        self.logger.info(f"最大切片长度: {max_length}")

        if sections:
            self.logger.info("章节预览:")
            for i, sec in enumerate(sections[:5]):
                title = sec.get("title", "")[:50]
                self.logger.info(f"  {i + 1}. {title}...")
            if len(sections) > 5:
                self.logger.info(f"  ... 还有 {len(sections) - 5} 个章节")

    def _backup_chunks(self, state: ImportGraphState, sections: List[dict]):
        """将切分结果备份到 JSON 文件"""
        self.log_step("step_7", "备份切片")

        local_dir = state.get("file_dir", "")
        if not local_dir:
            self.logger.debug("未设置 file_dir,跳过备份")
            return

        try:
            os.makedirs(local_dir, exist_ok=True)
            output_path = os.path.join(local_dir, "chunks.json")
            with open(output_path, "w", encoding="utf-8") as f:
                json.dump(sections, f, ensure_ascii=False, indent=2)
            self.logger.info(f"已备份到: {output_path}")
        except Exception as e:
            self.logger.warning(f"备份失败: {e}")


# ================================================================== #
#                        兼容 & 测试                                   #
# ================================================================== #

# 兼容原有调用方式
node_document_split = DocumentSplitNode()关键设计点:
title 与 body 分离存储
- 便于单独处理标题编号
- 便于计算 body 长度
- 最终组装时保持格式一致
代码围栏检测
- 使用状态机追踪 ``` 和 ~~~
- 避免代码块内的 # 被误识别为标题
分层切分策略
- 优先按段落切分(保持段落完整性)
- 段落超长时按句子切分(保持句子完整性)
- 装箱算法最大化利用空间
智能合并
- 只合并同一父标题下的片段
- 避免跨章节内容混合
- 标题回退为父标题保持清晰
5. 测试运行
5.1 测试代码
if __name__ == '__main__':
"""
文档切分节点测试
测试不同场景下的切分逻辑
"""
import json
import os
from knowledge.processor.import_process.base import setup_logging
from knowledge.processor.import_process.nodes.document_split import node_document_split
# 1. 开启日志
setup_logging()
print("=" * 60)
print("DocumentSplitNode 节点测试")
print("=" * 60)
# -------------------- 测试用例 1: 正常文档 -------------------- #
print("\n--- 测试用例 1: 正常 Markdown 文档 ---")
sample_md = """# 第一章 万用表概述
万用表是一种多功能测量仪器,可以测量电压、电流、电阻等。
## 1.1 基本组成
万用表主要由以下部分组成:
- 显示屏
- 旋钮
- 测量端口
## 1.2 工作原理
万用表内部电路根据选择的测量模式切换不同的测量电路。
## 1.3 注意事项
使用时注意安全。
## 1.4 保养方法
定期清洁。
"""
state = {
"file_title": "万用表的使用",
"md_content": sample_md,
"file_dir": r"D:\test_output"
}
result = node_document_split.process(state)
print(f"\n切分结果: {len(result['chunks'])} 个 chunks")
for i, chunk in enumerate(result['chunks']):
print(f"\n--- Chunk {i+1} ---")
print(f"标题: {chunk['title']}")
print(f"内容长度: {len(chunk['content'])} 字符")
print(f"内容预览: {chunk['content'][:100]}...")
# -------------------- 测试用例 2: 无标题文档 -------------------- #
print("\n\n--- 测试用例 2: 无标题文档 ---")
no_title_md = """这是一段没有标题的文档。
它包含多个段落,但没有使用 Markdown 标题格式。
这是第三段内容。
"""
state_no_title = {
"file_title": "无标题测试",
"md_content": no_title_md,
}
result_no_title = node_document_split.process(state_no_title)
print(f"切分结果: {len(result_no_title['chunks'])} 个 chunks")
print(f"标题: {result_no_title['chunks'][0]['title']}")
# -------------------- 测试用例 3: 代码块中的 # -------------------- #
print("\n\n--- 测试用例 3: 代码块中的 # 不应被识别为标题 ---")
code_block_md = """# 真正的标题
下面是一段 Python 代码:
```python
# 这是注释,不是标题
def hello():
print("Hello")5.2 运行测试
# 进入项目目录
cd knowledge

# 激活虚拟环境
.venv\Scripts\activate

# 运行测试
python -m knowledge.processor.import_process.nodes.document_split5.3 预期输出
============================================================
DocumentSplitNode 节点测试
============================================================

--- 测试用例 1: 正常 Markdown 文档 ---
2026-02-23 10:00:00 - import.document_split - INFO - --- document_split 开始 ---
2026-02-23 10:00:00 - import.document_split - INFO - [step_1] 获取输入
2026-02-23 10:00:00 - import.document_split - INFO - [step_2] 按标题切分
2026-02-23 10:00:00 - import.document_split - INFO - [step_4] 二次切分和合并
2026-02-23 10:00:00 - import.document_split - INFO - [step_5] 组装 content
2026-02-23 10:00:00 - import.document_split - INFO - [step_6] 输出统计
2026-02-23 10:00:00 - import.document_split - INFO - 原文档行数: 25
2026-02-23 10:00:00 - import.document_split - INFO - 最终切分章节数: 5
2026-02-23 10:00:00 - import.document_split - INFO - 最大切片长度: 500
2026-02-23 10:00:00 - import.document_split - INFO - 章节预览:
2026-02-23 10:00:00 - import.document_split - INFO -   1. # 第一章 万用表概述...
2026-02-23 10:00:00 - import.document_split - INFO -   2. ## 1.1 基本组成...
2026-02-23 10:00:00 - import.document_split - INFO -   3. ## 1.2 工作原理...
2026-02-23 10:00:00 - import.document_split - INFO -   4. ## 1.3 注意事项...
2026-02-23 10:00:00 - import.document_split - INFO -   5. ## 1.4 保养方法...
2026-02-23 10:00:00 - import.document_split - INFO - [step_7] 备份切片
2026-02-23 10:00:00 - import.document_split - INFO - --- document_split 完成 ---

切分结果: 5 个 chunks

--- Chunk 1 ---
标题: # 第一章 万用表概述
内容长度: 78 字符
内容预览: # 第一章 万用表概述

万用表是一种多功能测量仪器,可以测量电压、电流、电阻等。...

--- 测试用例 2: 无标题文档 ---
...
切分结果: 1 个 chunks
标题: 无标题

--- 测试用例 3: 代码块中的 # 不应被识别为标题 ---
...
切分结果: 2 个 chunks
  - # 真正的标题
  - ## 代码说明

--- 测试用例 4: 超长章节二次切分 ---
...
切分结果: 5 个 chunks
  - # 超长章节-1 (498 字符)
  - # 超长章节-2 (495 字符)
  - # 超长章节-3 (492 字符)
  - # 超长章节-4 (488 字符)
  - # 超长章节-5 (127 字符)

--- 测试用例 5: 空内容 ---
捕获到预期异常: [document_split] md_content 为空

============================================================
测试完成
============================================================6. 总结
6.1 节点功能概览
| 功能模块 | 说明 |
|---|---|
| 标题切分 | 按 Markdown 标题结构切分,保持语义完整 |
| 代码围栏检测 | 避免代码块内的 # 被误识别为标题 |
| 二次切分 | 超长章节按段落→句子逐级切分 |
| 短片段合并 | 避免信息碎片化,提高检索质量 |
| 装箱算法 | 最大化利用切片空间 |
| 备份机制 | 输出 chunks.json 便于调试 |
6.2 设计要点
分离 title 和 body
- 便于标题编号处理
- 便于长度计算
- 最终组装保持格式一致
代码围栏状态机
- 简洁的开关切换逻辑
- 支持 ``` 和 ~~~ 两种围栏
分层切分策略
- 段落优先(保持段落完整性)
- 句子兜底(保持句子完整性)
- 装箱算法最大化利用空间
智能合并约束
- 只合并同一父标题下的片段
- 避免跨章节内容混合
- 保持语义边界清晰
企业痛点映射
| 痛点 | 传统方案 | AI Agent 文档切分方案 | 效率提升 |
|---|---|---|---|
| PDF 转 MD 后需手工切分 | 人工按章节复制粘贴 | 自动按 Markdown 标题结构切分 | 每份文档从 10min 降至 ~2s |
| 切片太大导致检索不准 | 整段检索,噪声多 | max_length 控制 + 二次切分 | 检索精确度提升 ~30%(预估) |
| 切片太小导致语义丢失 | 简单按字数切分 | min_length 控制 + 智能合并 | 语义完整性提升 ~40%(预估) |
代码块中的 # 被误认标题 | 手工过滤代码块 | 代码围栏状态机自动检测 | 标题误识别率降为 ~0% |
| 超长章节无法自动拆分 | 手动拆分或跳过 | 段落→句子逐级装箱算法 | 全自动拆分,零人工 |
Remote & Agent 应用场景价值
Remote 场景价值:文档切分的配置参数(
max_length/min_length)可以通过.env文件统一管理,远程团队成员使用相同配置确保切片一致性。chunks.json备份机制方便异地团队审查切分质量。Agent 落地场景:DocumentSplitNode 可封装为"文档切分 Agent"——Agent 接收 Markdown 内容 → 自动识别标题结构 → 按配置参数切分 → 输出 chunks。切分策略可作为 Agent 的"工具"(tool),被上层 Orchestrator 调用。max_length / min_length 可以作为 Agent 的动态参数,根据文档类型自适应调整。
Git Commit 对应
本节文档切分节点对应的提交记录(参考值,以实际版本为准):
<待补充 — 建议在项目仓库中搜索 "document_split.py" 相关提交>cd shopkeeper_brain
# 查看文档切分相关代码
git log --oneline --all -- knowledge/processor/import_process/nodes/document_split.py