
商品名识别节点
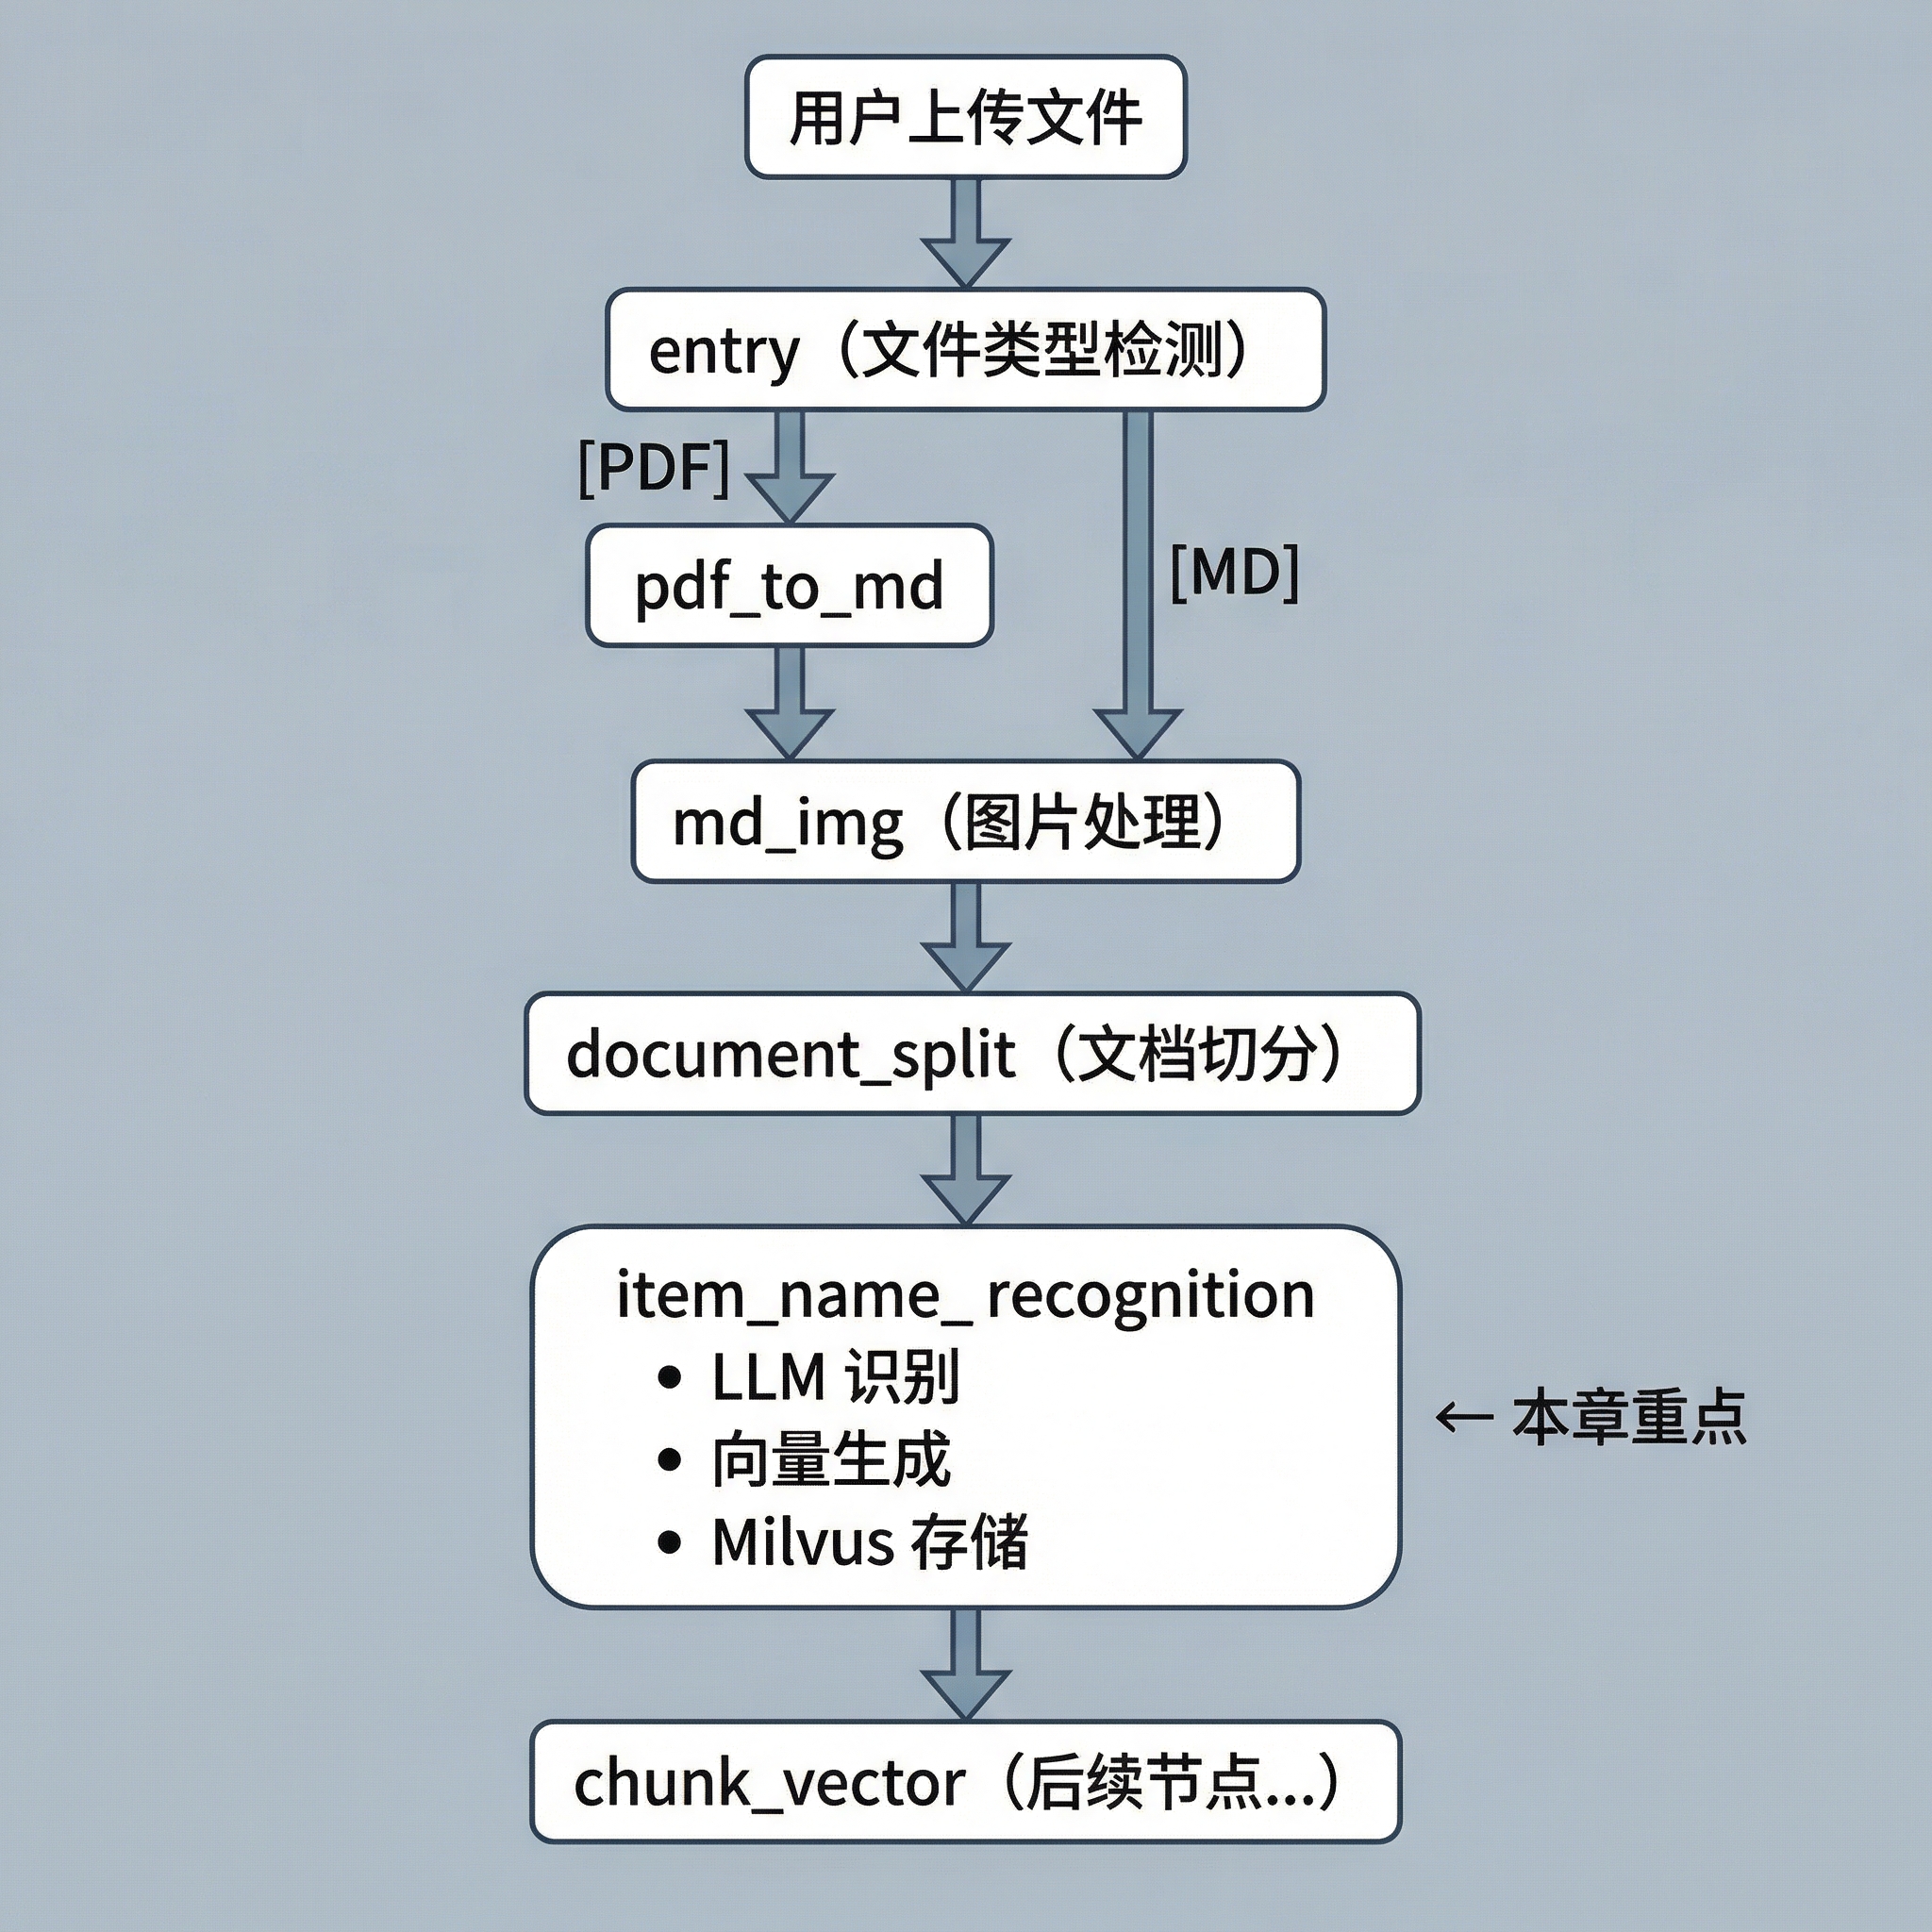
本文档详细介绍知识库导入流程中的商品名识别节点(ItemNameRecognitionNode),该节点负责从文档切片中识别商品/产品名称,并将识别结果向量化后存储到 Milvus 向量数据库,为后续的商品级检索和知识图谱构建提供基础数据。
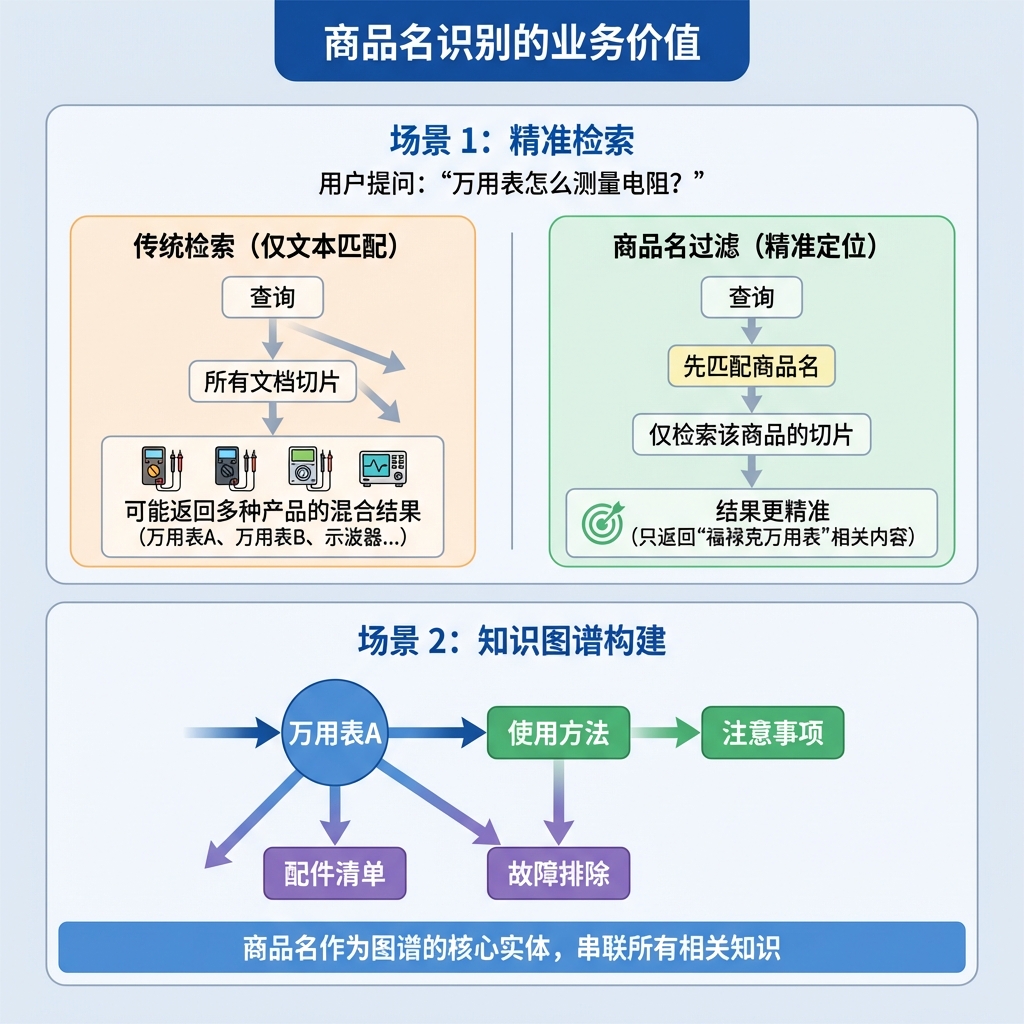
学习理念:商品名识别节点是知识库从"文档"到"商品"的语义桥梁——ItemNameRecognitionNode 通过 LLM 从文档切片中提取商品名称,用 BGE-M3 生成混合嵌入向量,最后写入 Milvus。核心价值:有了商品名索引,用户才能搜到"福禄克15B+"而不是"那篇关于万用表的PDF"。
海外对标:ItemNameRecognitionNode 的"LLM 提取实体 → BGE 混合嵌入 → Milvus 向量存储"流程对标 Google Document AI 的 Entity Extraction + Vertex AI Vector Search 方案,以及 LangChain 的 "LLM Extractor + MultiVector Retriever" 模式。BGE-M3 模型由 BAAI(北京智源研究院)开源,是 2024-2026 年 Milvus 生态中最主流的混合嵌入模型。
本节 AI 替代率:~80% | 人工干预率:~20%
| 角色 | 能力范围 |
|---|---|
| 🤖 AI 擅长 | LLM 调用代码、Prompt 模板、BGE-M3 嵌入调用、Milvus Schema 定义、CSR 稀疏向量提取、集合创建与索引配置 |
| 👤 人类需理解 | LLM Prompt 设计(如何引导模型准确提取商品名)、降级策略(LLM 失败/向量失败/Milvus 失败时的 fallback 逻辑)、BGE-M3 模型本地部署的硬件要求 |
阅读指引
| 颜色 | 章节 | AI 替代率 | 人工干预 | 说明 |
|---|---|---|---|---|
| 🟡 | §1 任务目标 | ~95% | ~5% | 学习目标明确 |
| 🟢 | §2 核心概念扫盲 | ~95% | ~5% | LLM 调用 / BGE-M3 / Milvus Schema 都是 API 级知识 |
| 🟡 | §3 整体流程 | ~90% | ~10% | 理解数据流转流程即可 |
| 🔴 | §4 分步实现 | ~70% | ~30% | 6 步流程中 Step 3(LLM Prompt) + Step 5(向量提取) 逻辑较复杂 |
| 🟢 | §4.4 主代码 | ~80% | ~20% | ItemNameRecognitionNode 整体架构清晰,_recognize_item_name 是核心 |
| 🟢 | §5 测试运行 | ~90% | ~10% | 看预期输出即可 |
| 🟡 | §6 总结 | ~90% | ~10% | 设计要点回顾 |
技术栈健康度标签体系
| 技术 | 健康度 | 建议 |
|---|---|---|
| LangChain ChatOpenAI | 🔥 巅峰 | LLM 调用的行业标准封装,兼容 OpenAI / DashScope / Zhipu 等 API。 |
| BGE-M3 | 🔥 巅峰 | BAAI 开源的混合嵌入模型,同时输出稠密向量 + 稀疏向量。Milvus 混合检索的事实标准。2025-2026 年新兴模型有 BGE-Multilingual-Gemma2 和 GTE-Qwen2。 |
| Milvus | 🟢 稳定 | 核心向量数据库,支持混合检索(稠密 + 稀疏)。Schema 定义 + AUTOINDEX 索引配置是标准操作。 |
| CSR 稀疏矩阵 | 🟢 稳定 | BGE-M3 输出稀疏向量的标准格式。提取 indices + data 组合为 {token_id: weight} 是固定套路。 |
| Prompt Engineering | ⏳ 成长期 | LLM 信息提取的核心技能。2025-2026 年逐步被 Structured Output / Function Calling 替代。 |
体系说明:🟢🟡🟠🔴 标识学习优先级 / AI 替代率;🔥🟢⏳⚠️💀 标识技术栈健康度。
中英文对照表
| English | 中文 | 本质 |
|---|---|---|
| Item Name Recognition | 商品名识别 | 从文档中提取商品/产品名称的 NLP 任务 |
| Hybrid Embedding | 混合嵌入 | 同时生成稠密向量(语义)和稀疏向量(关键词)的嵌入方式 |
| Dense Vector | 稠密向量 | 浮点数数组,捕捉文本的语义相似性 |
| Sparse Vector | 稀疏向量 | TokenID → Weight 的字典,捕捉精确的关键词匹配 |
| CSR Matrix | 压缩稀疏行矩阵 | 稀疏矩阵的高效存储格式,BGE-M3 的默认输出格式 |
| Collection Schema | 集合模式 | Milvus 中定义字段名称和类型的结构定义 |
| AUTOINDEX | 自动索引 | Milvus 自动选择最优索引算法的配置 |
| Fallback / Graceful Degradation | 降级/优雅降级 | 某模块失败时系统仍能部分运行的设计策略 |
💡 程序员比喻
- ItemNameRecognitionNode 就像
grep+awk+INSERT INTO的 Pipeline——先用 LLM(grep -P)提取商品名,再用 BGE-M3(awk)转换成向量,最后写入 Milvus(INSERT)。- BGE-M3 混合嵌入 就像 Elasticsearch 的
multi_matchquery——dense= 全文搜索(语义),sparse= term 搜索(关键词),两者 AND 在一起效果最好。- CSR 稀疏矩阵提取 就像解析
.git/index文件——虽然是二进制格式,但提取方式固定(indices + data → dict)。- LLM 降级策略 就像 Kubernetes 的 Readiness Probe——
/healthz挂了就用缓存(file_title)顶上,不影响主流程。- Milvus Schema + 索引 就像 SQL 的
CREATE TABLE+CREATE INDEX——先定义表结构,再建索引加速查询。
1. 任务目标
1.1 本章目标
通过本章学习,你将掌握:
- LLM 调用:学会使用 LangChain 封装调用大语言模型进行信息提取
- Prompt 工程:理解商品名识别的提示词设计思路
- BGE-M3 混合嵌入:掌握同时生成稠密向量和稀疏向量的技术
- Milvus 集合管理:学会创建带索引的向量集合并插入数据
- 状态回填:理解如何将识别结果回填到图状态和切片中
1.2 涉及文件
knowledge/
├── processor/import_process/nodes/
│   └── item_name_recognition.py    # 商品名识别节点(本章重点)
│
└── tools/
    ├── llm_utils.py                # LLM 客户端工具
    ├── embedding_utils.py          # 向量嵌入工具(BGE-M3)
    ├── milvus_utils.py             # Milvus 连接管理
└── normalize_sparse_vector.py # 稀疏向量归一化1.3 节点在流程中的位置
2. 核心概念扫盲
2.1 为什么需要商品名识别?
在知识库系统中,商品名称是连接文档与用户查询的关键桥梁:
2.2 LLM 信息提取
大语言模型(LLM) 是从非结构化文本中提取结构化信息的利器:
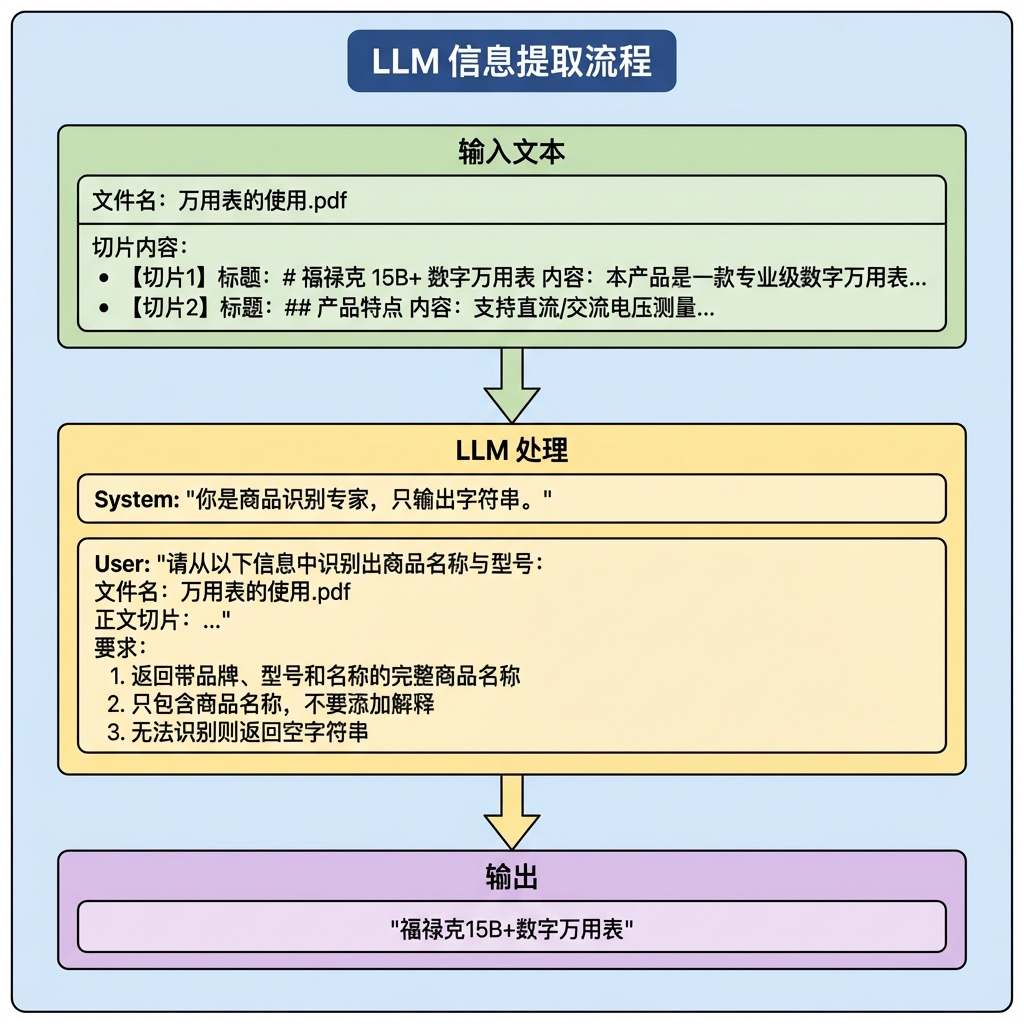
LangChain 调用方式:
🟡 【P1 看注释就行】 LangChain ChatOpenAI 调用模式固定——
ChatOpenAI(model, temperature)→llm.invoke(messages)。理解 SystemMessage + HumanMessage 的消息结构即可。
from langchain_openai import ChatOpenAI
from langchain_core.messages import SystemMessage, HumanMessage

# 1. 创建 LLM 客户端
llm = ChatOpenAI(
    model="qwen3-32b",
    temperature=0.1,           # 低温度 = 更确定性输出
    api_key="...",
    base_url="...",
)

# 2. 构建消息
messages = [
    SystemMessage(content="你是商品识别专家,只输出字符串。"),
    HumanMessage(content="请从以下信息中识别商品名称:..."),
]

# 3. 调用并获取响应
response = llm.invoke(messages)
item_name = response.content.strip()2.3 BGE-M3 混合嵌入
BGE-M3 是一个强大的嵌入模型,能同时生成稠密向量和稀疏向量:
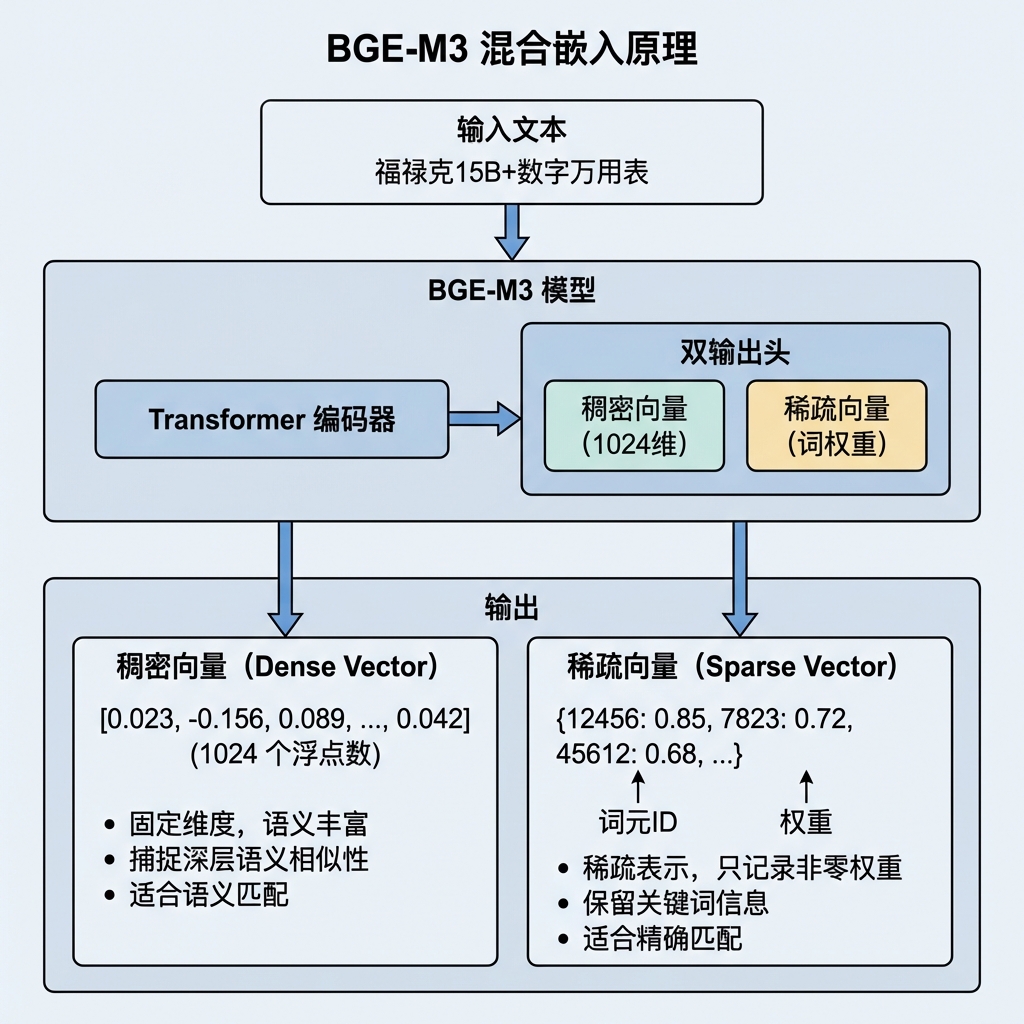
为什么需要混合嵌入?
| 向量类型 | 优势 | 劣势 | 适用场景 |
|---|---|---|---|
| 稠密向量 | 语义理解强,能识别同义词 | 可能丢失关键词信息 | "如何使用万用表" ↔ "万用表操作方法" |
| 稀疏向量 | 精确匹配关键词 | 语义理解弱 | "福禄克15B+" 精确匹配型号 |
| 混合检索 | 兼顾语义和关键词 | 计算成本略高 | 生产环境推荐方案 |
代码示例:
🔥 【P0 必须要学】 BGE-M3 混合嵌入是 Milvus 混合检索的核心。重点理解:
encode_documents同时返回dense和sparse,CSR 矩阵的indices(词ID)+data(权重)提取为{token_id: weight}字典。这段代码在后续向量检索中会反复用到。
from pymilvus.model.hybrid import BGEM3EmbeddingFunction

# 1. 加载模型
bge_m3 = BGEM3EmbeddingFunction(
    model_name="BAAI/bge-m3",
    device="cuda:0",
    use_fp16=True,
)

# 2. 生成嵌入
embeddings = bge_m3.encode_documents(["福禄克15B+数字万用表"])

# 3. 提取向量
dense_vector = embeddings["dense"][0].tolist()   # List[float], 长度 1024
sparse_matrix = embeddings["sparse"]              # CSR 稀疏矩阵

# 4. 从 CSR 矩阵提取稀疏向量
start_idx = sparse_matrix.indptr[0]
end_idx = sparse_matrix.indptr[1]
token_ids = sparse_matrix.indices[start_idx:end_idx].tolist()
weights = sparse_matrix.data[start_idx:end_idx].tolist()
sparse_vector = dict(zip(token_ids, weights)) # Dict[int, float]2.4 Milvus 向量数据库
Milvus 是专为向量检索设计的开源数据库:
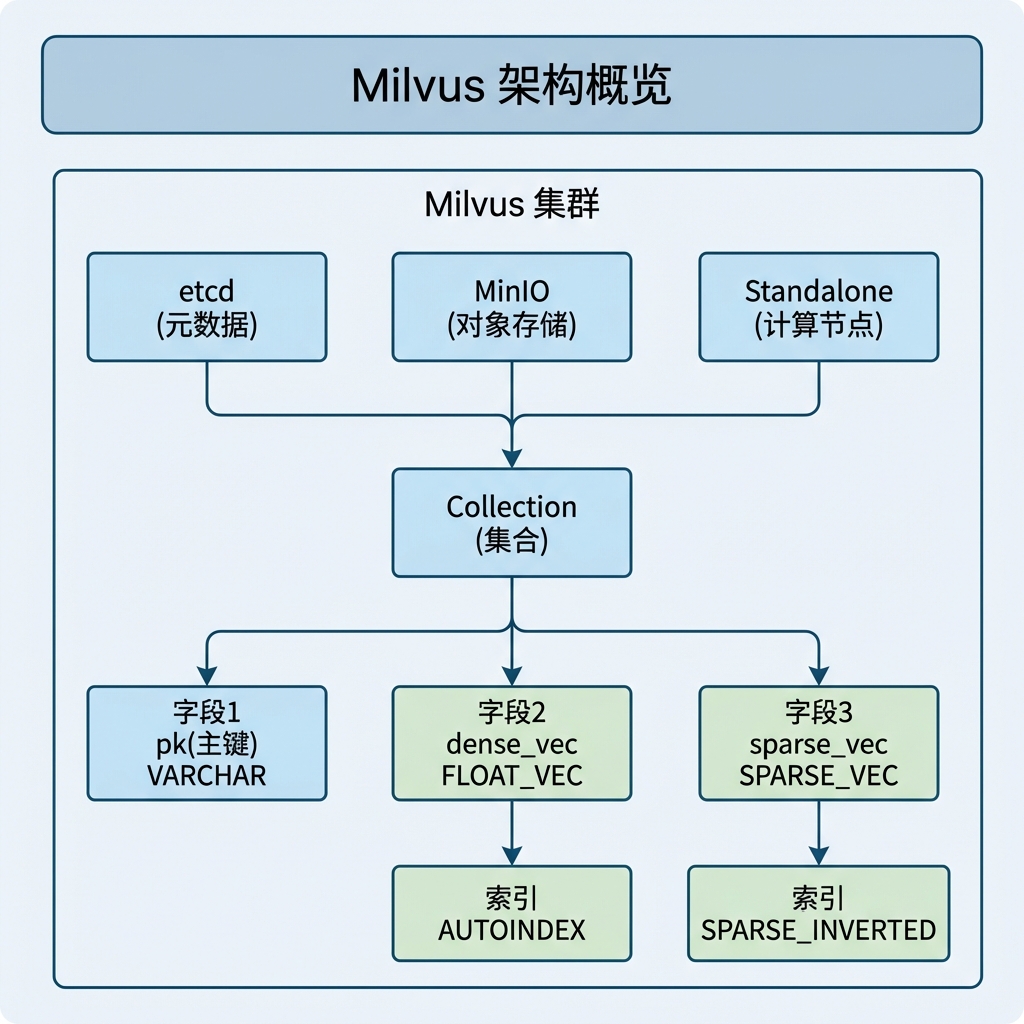
集合 Schema 设计:
🟡 【P1 看注释就行】 Milvus Schema 定义代码固定——
create_schema()→add_field()× N 添加字段。注意 DataType 的类型映射(VARCHAR / FLOAT_VECTOR / SPARSE_FLOAT_VECTOR)。
from pymilvus import DataType

# 创建 Schema
schema = client.create_schema(enable_dynamic_fields=True)

# 添加字段
schema.add_field(
    field_name="pk",
    datatype=DataType.VARCHAR,
    is_primary=True,
    auto_id=True,        # 自动生成主键
    max_length=100
)
schema.add_field(
    field_name="file_title",
    datatype=DataType.VARCHAR,
    max_length=65535
)
schema.add_field(
    field_name="item_name",
    datatype=DataType.VARCHAR,
    max_length=65535
)
schema.add_field(
    field_name="dense_vector",
    datatype=DataType.FLOAT_VECTOR,
    dim=1024             # BGE-M3 输出维度
)
schema.add_field(
    field_name="sparse_vector",
    datatype=DataType.SPARSE_FLOAT_VECTOR
)索引配置:
🟡 【P1 看注释就行】 索引配置模式固定——稠密向量用 AUTOINDEX + IP,稀疏向量用 SPARSE_INVERTED_INDEX + IP。可直接复制复用。
index_params = client.prepare_index_params()

# 稠密向量索引(自动选择最优算法)
index_params.add_index(
    field_name="dense_vector",
    index_name="dense_vector_index",
    index_type="AUTOINDEX",       # 自动选择 HNSW 等算法
    metric_type="IP"              # 内积(余弦相似度)
)

# 稀疏向量索引(倒排索引)
index_params.add_index(
    field_name="sparse_vector",
    index_name="sparse_inverted_index",
    index_type="SPARSE_INVERTED_INDEX",
    metric_type="IP"
)3. 商品名识别业务处理流程(总)
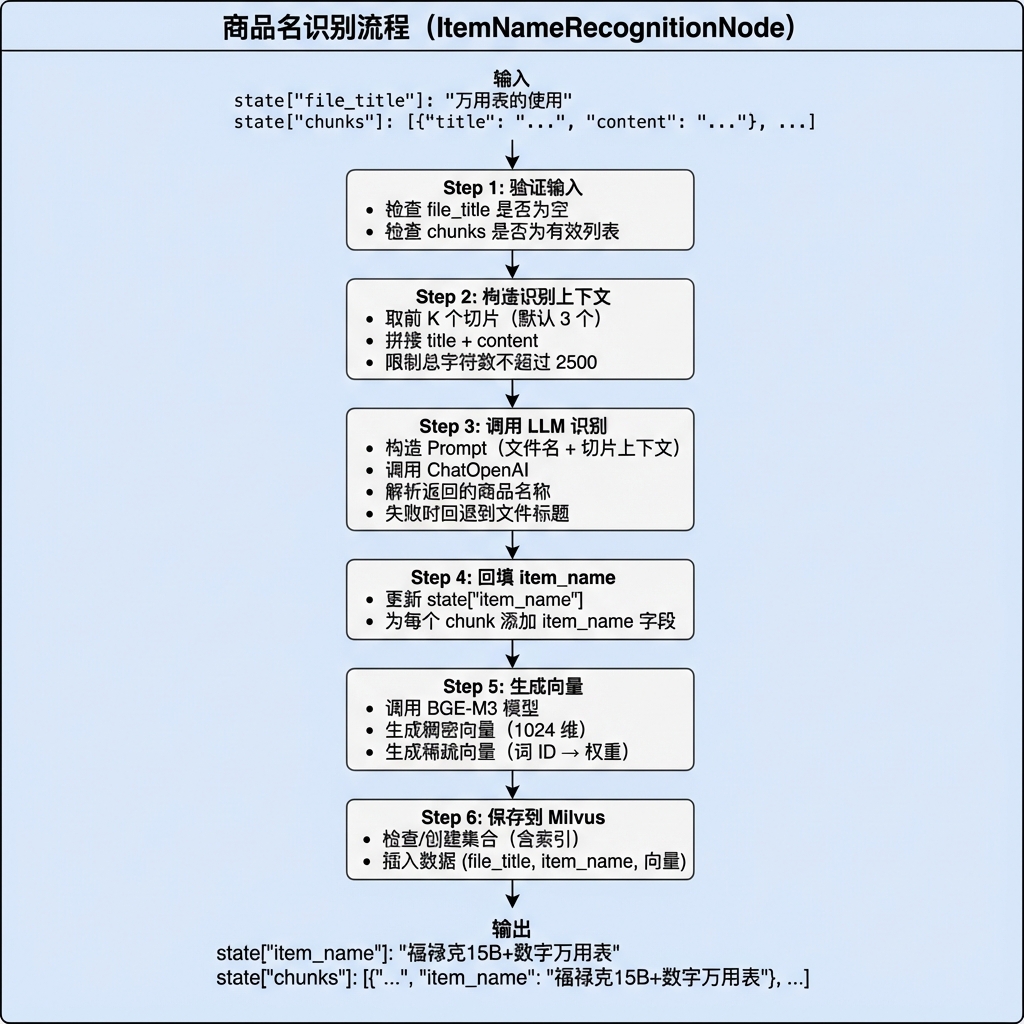
3.1 整体流程概述
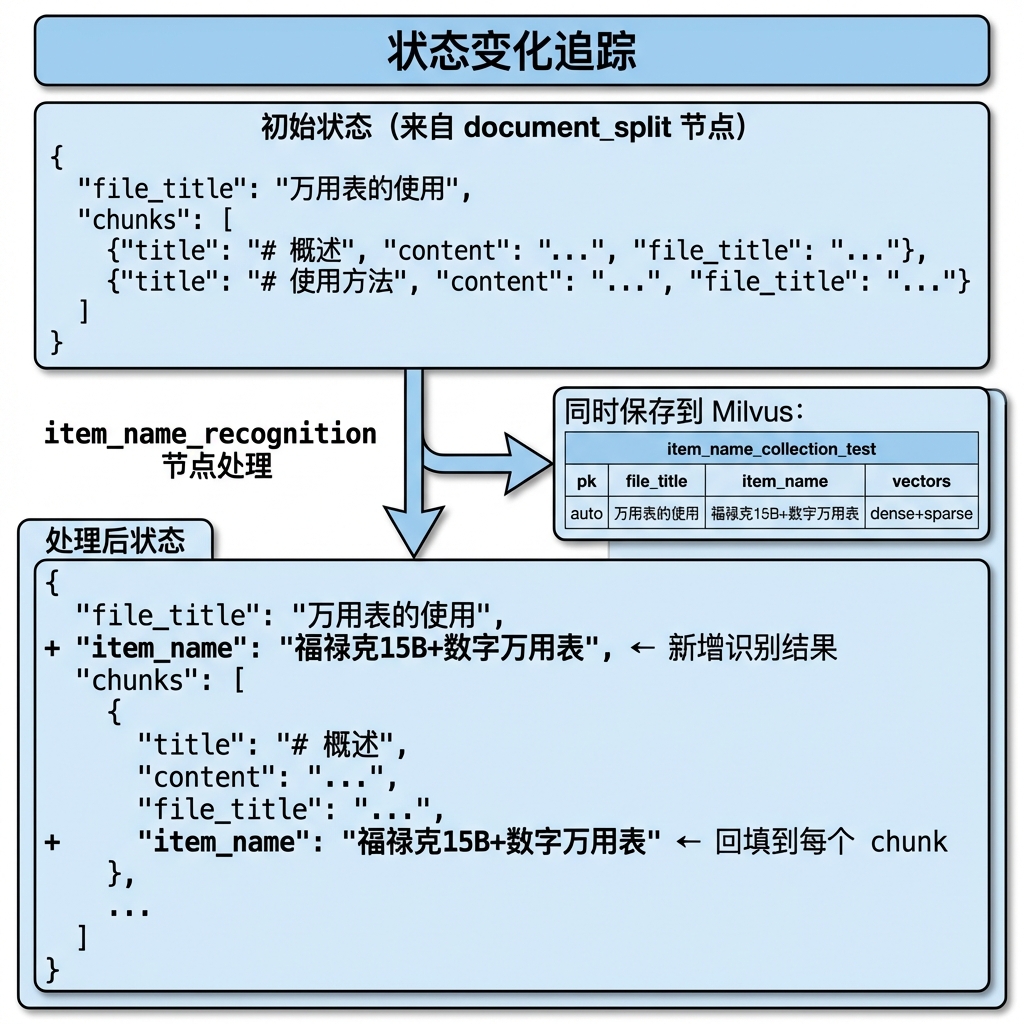
3.2 数据流转
4. 商品名识别业务处理流程(分)
4.1 目标
- 从文档切片中准确识别商品/产品名称(包含品牌、型号)
- 将识别结果回填到图状态和每个切片中
- 生成商品名称的混合嵌入向量(稠密 + 稀疏)
- 将商品名及向量持久化到 Milvus 向量数据库
4.2 需求分析
输入:
file_title:文件标题(如 "万用表的使用")chunks:文档切片列表,每个切片包含 title 和 content
输出:
item_name:识别出的商品名称- 更新后的
chunks:每个切片增加item_name字段 - Milvus 中新增一条商品名记录
配置参数:
item_name_chunk_k:用于识别的切片数量(默认 3)item_model:使用的 LLM 模型名称milvus_url:Milvus 服务地址item_name_collection:商品名集合名称
边界条件处理:
| 场景 | 处理方式 |
|---|---|
file_title 为空 | 抛出 ValidationError |
chunks 为空或无效 | 抛出 ValidationError |
| LLM 调用失败 | 使用 file_title 作为 item_name |
| LLM 返回空字符串 | 使用 file_title 作为 item_name |
| 向量生成失败 | 记录警告,跳过 Milvus 存储 |
| Milvus 配置缺失 | 记录警告,跳过存储 |
4.3 实现流程
4.3.1 实现流程图
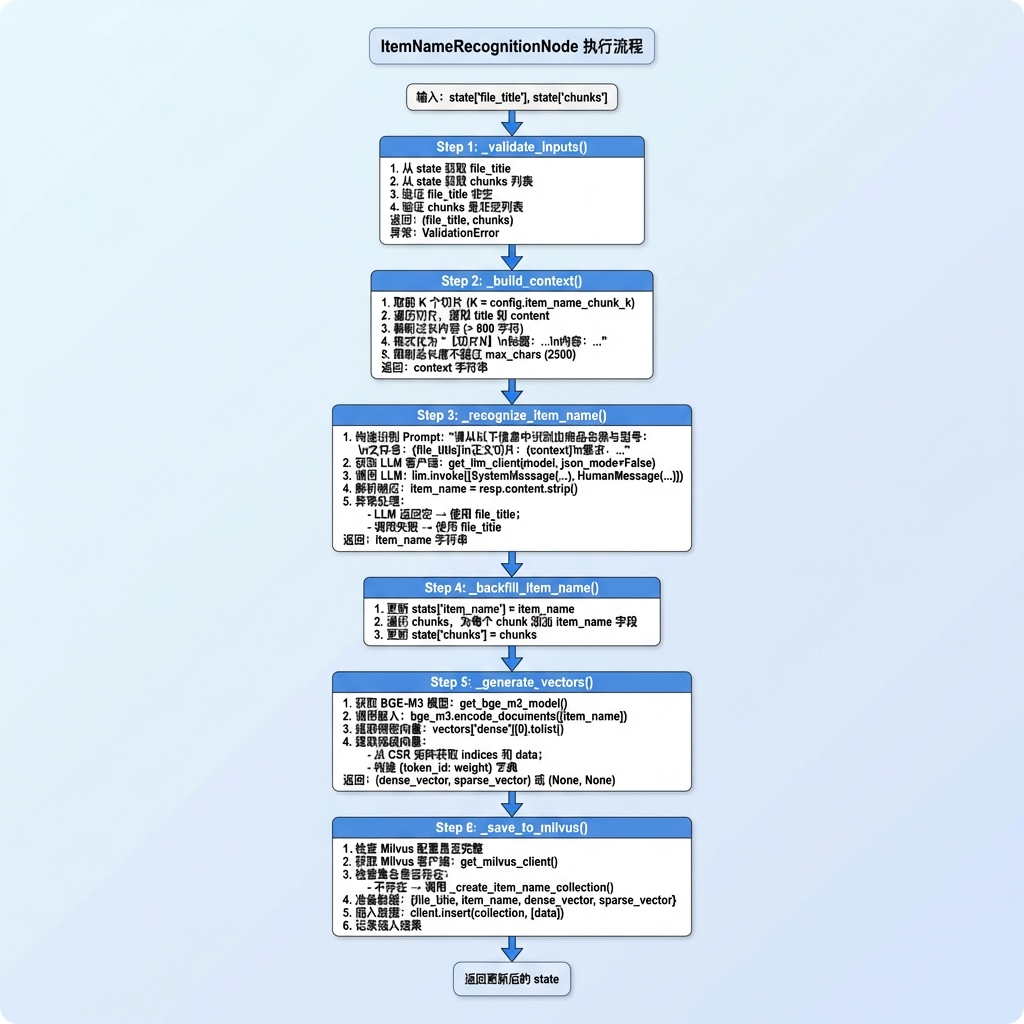
4.3.2 具体实现步骤
Step 1: 验证输入
功能描述: 验证输入状态中的必要字段,确保后续处理有有效数据。
实现要点:
获取 file_title
- 从
state.get("file_title", "")获取文件标题 - 这是商品名识别的重要参考信息
- 从
获取 chunks
- 从
state.get("chunks", [])获取切片列表 - 切片内容用于辅助 LLM 识别
- 从
验证 file_title 非空
- 如果为空字符串,抛出
ValidationError - 错误信息明确指出问题所在
- 如果为空字符串,抛出
验证 chunks 有效性
- 检查是否为列表类型
- 检查列表是否为空
- 不满足条件则抛出
ValidationError
记录日志
- 输出文件标题和切片数量
- 便于调试和监控
代码片段:
🟡 【P1 看注释就行】 Step 1 验证输入代码模式固定——从 state get → 判空 → 抛异常。
def _validate_inputs(self, state: ImportGraphState) -> Tuple[str, List[dict]]:
    """验证输入"""
    self.log_step("step_1", "验证输入")

    file_title = state.get("file_title", "")
    chunks = state.get("chunks", [])

    if not file_title:
        raise ValidationError("file_title 为空", node_name=self.name)

    if not isinstance(chunks, list) or not chunks:
        raise ValidationError("chunks 为空或无效", node_name=self.name)

    self.logger.info(f"文件标题: {file_title}, 切片数: {len(chunks)}")
return file_title, chunksStep 2: 构造识别上下文
功能描述: 从前 K 个切片中提取关键信息,构造供 LLM 识别的上下文文本。
实现要点:
确定取样数量
- 默认取前 K 个切片(K 由配置决定,通常为 3)
- 前几个切片通常包含商品概述、型号等关键信息
遍历切片提取信息
- 获取每个切片的 title 和 content
- 跳过空切片或非字典类型
截断过长内容
- 单个切片 content 超过 800 字符时截断
- 避免上下文过长影响 LLM 处理
格式化输出
- 使用 "【切片N】\n标题:...\n内容:..." 格式
- 结构化的输入有助于 LLM 理解
限制总长度
- 最终上下文不超过 max_chars(默认 2500)
- 累计字符数达到阈值后停止添加
代码片段:
🟡 【P1 看注释就行】 Step 2 上下文构造代码——遍历前 K 个切片,截断超长内容,拼接为结构化文本。注意
max_chars限制防止 Prompt 过长。
def _build_context(self, chunks: List[dict], k: int, max_chars: int = 2500) -> str:
    """构造识别上下文"""
    self.log_step("step_2", "构造识别上下文")

    parts = []
    total = 0

    for i, chunk in enumerate(chunks[:k]):
        if not isinstance(chunk, dict):
            continue

        title = (chunk.get("title") or "").strip()
        content = (chunk.get("content") or "").strip()

        if not (title or content):
            continue

        # 截断过长内容
        if len(content) > 800:
            content = content[:800] + "..."

        piece = f"【切片{i + 1}】\n标题:{title}\n内容:{content}"
        parts.append(piece)
        total += len(piece)

        if total >= max_chars:
            break

return "\n\n".join(parts)[:max_chars]Step 3: 调用 LLM 识别
功能描述: 调用大语言模型从文件标题和切片内容中识别商品名称。
实现要点:
构造 Prompt
- 包含文件名和正文切片
- 明确要求返回格式(带品牌、型号的完整商品名称)
- 说明无法识别时返回空字符串
获取 LLM 客户端
- 使用
get_llm_client()获取单例客户端 - 指定模型名称,关闭 JSON 模式(返回纯文本)
- 使用
构建消息列表
- SystemMessage:设定角色为商品识别专家
- HumanMessage:包含实际的识别请求
调用 LLM
- 使用
llm.invoke(messages)执行调用 - 从响应中提取 content 字段
- 使用
处理返回结果
- 去除首尾空白字符
- 空结果使用 file_title 作为回退
异常处理
- LLM 调用失败时记录警告
- 回退使用 file_title 确保流程继续
代码片段:
🔥 【P0 必须要学】 Step 3 LLM Prompt 是商品名识别的核心逻辑。注意 Prompt 结构:文件名 → 正文切片 → 输出格式要求(带品牌型号 + 只输出商品名)。
get_llm_client(model=config.item_model, json_mode=False)关闭 JSON 模式是关键——我们要纯文本响应。
def _recognize_item_name(self, file_title: str, context: str, config) -> str:
    """调用 LLM 识别商品名称"""
    self.log_step("step_3", "调用 LLM 识别")

    prompt = f"""
请从以下信息中识别出商品名称与型号:
文件名:{file_title}

正文切片(用于辅助识别):
{context}

要求:
1. 返回内容为字符形式,最好是带品牌、型号和名称的完整商品名称。比如:苏伯尓5000W大功率电磁炉;
2. 返回结果应该只包含商品名称,不要添加任何解释或其他内容;
3. 如果无法识别商品名称,请返回空字符串。
"""

    try:
        llm = get_llm_client(model=config.item_model, json_mode=False)
        resp = llm.invoke([
            SystemMessage(content="你是商品识别专家,只输出字符串。"),
            HumanMessage(content=prompt),
        ])

        item_name = getattr(resp, "content", "").strip()

        if not item_name:
            self.logger.warning("LLM 未能识别商品名称,使用文件标题")
            item_name = file_title

        self.logger.info(f"识别结果: {item_name}")
        return item_name

    except Exception as e:
        self.logger.warning(f"LLM 调用失败: {e},使用文件标题作为商品名称")
return file_titleStep 4: 回填 item_name
功能描述: 将识别出的商品名称回填到状态和每个切片中,供后续节点使用。
实现要点:
更新 state 级别的 item_name
- 设置
state["item_name"] = item_name - 这是全局的商品名标识
- 设置
遍历所有切片
- 为每个 chunk 字典添加
item_name字段 - 使用相同的 item_name 值
- 为每个 chunk 字典添加
更新 state 中的 chunks
- 由于 Python 字典是引用类型,直接修改即生效
- 显式赋值
state["chunks"] = chunks确保更新
代码片段:
🟡 【P1 看注释就行】 Step 4 回填代码简单——
state["item_name"] = item_name,遍历 chunks 设置chunk["item_name"]。Python 字典引用修改即生效。
def _backfill_item_name(self, state: ImportGraphState, chunks: List[dict], item_name: str):
    """回填 item_name 到 state 和 chunks"""
    self.log_step("step_4", "回填 item_name")

    state["item_name"] = item_name

    for chunk in chunks:
        chunk["item_name"] = item_name

state["chunks"] = chunksStep 5: 生成向量
功能描述: 使用 BGE-M3 模型为商品名称生成稠密向量和稀疏向量。
实现要点:
获取 BGE-M3 模型
- 使用
get_bge_m3_model()获取单例模型 - 首次调用会加载模型到 GPU
- 使用
调用嵌入方法
- 使用
encode_documents([item_name])生成嵌入 - 输入是列表,即使只有一个文本
- 使用
提取稠密向量
- 从
vectors["dense"][0]获取第一个文本的稠密向量 - 使用
.tolist()转换为 Python 列表
- 从
提取稀疏向量
- 稀疏向量存储为 CSR(压缩稀疏行)矩阵格式
- 使用
indptr确定行边界 - 使用
indices获取非零元素的列索引(词 ID) - 使用
data获取非零元素的值(权重) - 组合为
{token_id: weight}字典
异常处理
- 模型调用失败时返回 (None, None)
- 记录警告日志
代码片段:
🟡 【P1 看注释就行】 Step 5 向量生成代码模式固定——
get_bge_m3_model()→encode_documents([item_name])→dense[0].tolist()+ CSR 提取。注意Optional返回值用于降级。
def _generate_vectors(self, item_name: str) -> Tuple[Optional[List[float]], Optional[dict]]:
    """生成向量"""
    self.log_step("step_5", "生成向量")

    try:
        bge_m3_ef = get_bge_m3_model()
        vectors = bge_m3_ef.encode_documents([item_name])

        if vectors:
            dense_vector = vectors["dense"][0].tolist()

            # 提取稀疏向量
            start_idx = vectors["sparse"].indptr[0]
            end_idx = vectors["sparse"].indptr[1]
            token_ids = vectors["sparse"].indices[start_idx:end_idx].tolist()
            weights = vectors["sparse"].data[start_idx:end_idx].tolist()
            sparse_vector = dict(zip(token_ids, weights))

            self.logger.info("向量生成成功")
            return dense_vector, sparse_vector

    except Exception as e:
        self.logger.warning(f"向量生成失败: {e}")

return None, NoneStep 6: 保存到 Milvus
功能描述: 将商品名称及其向量持久化到 Milvus 向量数据库。
实现要点:
检查配置完整性
- 验证
milvus_url和item_name_collection是否配置 - 缺失则跳过保存,记录警告
- 验证
获取 Milvus 客户端
- 使用
get_milvus_client()获取单例连接 - 通过环境变量配置连接地址
- 使用
检查/创建集合
- 使用
client.has_collection()检查集合是否存在 - 不存在则调用
_create_item_name_collection()创建
- 使用
准备插入数据
- 构建包含所有字段的字典
- 稀疏向量需要归一化处理
执行插入
- 使用
client.insert()插入数据 - 数据需要包装为列表
[data]
- 使用
更新 state
- 确保
state["item_name"]已更新 - 便于后续节点访问
- 确保
异常处理
- 捕获所有异常,记录警告
- 不中断流程,允许优雅降级
代码片段:
🟡 【P1 看注释就行】 Step 6 Milvus 保存代码——检查配置 → 获取客户端 →
has_collection→create_collection→insert。注意normalize_sparse_vector()对稀疏向量的预处理。
def _save_to_milvus(
        self,
        state: ImportGraphState,
        file_title: str,
        item_name: str,
        dense_vector: Optional[List[float]],
        sparse_vector: Optional[dict],
        config
):
    """保存到 Milvus"""
    self.log_step("step_6", "保存到 Milvus")

    if not config.milvus_url or not config.item_name_collection:
        self.logger.warning("Milvus 配置不完整,跳过保存")
        return

    try:
        # 1. 获取 Milvus 客户端
        client = get_milvus_client()

        # 2. 获取集合名字
        collection_name = "item_name_collection_test"

        # 3. 检查并创建集合
        if not client.has_collection(collection_name=collection_name):
            self._create_item_name_collection(client, collection_name)

        # 4. 准备数据
        data = {
            "file_title": file_title,
            "item_name": item_name
        }

        # 5. 构建稠密向量
        if dense_vector is not None:
            data["dense_vector"] = dense_vector

        # 6. 构建稀疏向量
        if sparse_vector is not None:
            data["sparse_vector"] = normalize_sparse_vector(sparse_vector)

        # 7. 插入数据
        result = client.insert(collection_name=collection_name, data=[data])
        self.logger.info(f"已保存到 Milvus,ID: {result['ids'][0]}")

        state["item_name"] = item_name

    except Exception as e:
self.logger.warning(f"Milvus 保存失败: {e}")辅助方法: 创建集合
功能描述: 创建商品名集合的 Schema 和索引。
实现要点:
定义 Schema
- 启用动态字段
enable_dynamic_fields=True - 主键 pk 使用自动递增
- 启用动态字段
添加字段
pk:VARCHAR 类型主键,自动生成file_title:文件标题item_name:商品名称dense_vector:1024 维浮点向量sparse_vector:稀疏浮点向量
创建索引
- 稠密向量使用 AUTOINDEX(自动选择最优算法)
- 稀疏向量使用 SPARSE_INVERTED_INDEX(倒排索引)
- 度量类型均使用内积(IP)
创建集合
- 将 schema 和 index_params 一起传入
- 集合创建后自动加载
代码片段:
🟡 【P1 看注释就行】 辅助方法:创建集合代码模式固定——定义 Schema → 建索引 → create_collection。AUTOINDEX + SPARSE_INVERTED_INDEX 是 Milvus 标准配置。
def _create_item_name_collection(self, client, collection_name: str):
    """创建 item_name 集合"""
    self.logger.info(f"创建集合: {collection_name}")

    # 1. 定义字段
    schema = client.create_schema(enable_dynamic_fields=True)

    schema.add_field(field_name="pk", datatype=DataType.VARCHAR,
                     is_primary=True, auto_id=True, max_length=100)
    schema.add_field(field_name="file_title", datatype=DataType.VARCHAR, max_length=65535)
    schema.add_field(field_name="item_name", datatype=DataType.VARCHAR, max_length=65535)
    schema.add_field(field_name="dense_vector", datatype=DataType.FLOAT_VECTOR, dim=1024)
    schema.add_field(field_name="sparse_vector", datatype=DataType.SPARSE_FLOAT_VECTOR)

    # 2. 创建索引
    index_params = client.prepare_index_params()
    index_params.add_index(
        field_name="dense_vector",
        index_name="dense_vector_index",
        index_type="AUTOINDEX",
        metric_type="IP"
    )
    index_params.add_index(
        field_name="sparse_vector",
        index_name="sparse_inverted_index",
        index_type="SPARSE_INVERTED_INDEX",
        metric_type="IP"
    )

    # 3. 创建集合
    client.create_collection(
        collection_name=collection_name,
        schema=schema,
        index_params=index_params
    )
self.logger.info(f"集合 {collection_name} 创建成功")4.4 代码实现
🔥 【P0 必须要学】 ItemNameRecognitionNode 的整体流程是"LLM 提取 → 向量化 → 存储"的完整范式。重点理解:6 步流程的编排(验证→上下文→LLM→回填→向量→Milvus),以及每一步的异常处理(LLM 失败用 file_title、向量失败跳过 Milvus)。
# knowledge/processor/import_process/nodes/item_name_recognition.py

"""
商品名称识别节点

从文档切片中识别商品/产品名称
"""
import json
import os
from typing import List, Tuple, Optional
from pymilvus import DataType

from knowledge.processor.import_process.base import BaseNode, setup_logging
from knowledge.processor.import_process.state import ImportGraphState
from knowledge.processor.import_process.config import get_config
from knowledge.processor.import_process.exceptions import LLMError, ValidationError

from knowledge.tools.llm_utils import get_llm_client
from knowledge.tools.embedding_utils import get_bge_m3_model
from knowledge.tools.milvus_utils import get_milvus_client
from knowledge.tools.normalize_sparse_vector import normalize_sparse_vector
from langchain_core.messages import SystemMessage, HumanMessage


class ItemNameRecognitionNode(BaseNode):
    """
    商品名称识别节点

    处理流程:
    1. 接收输入验证
    2. 从前几个切片构造识别上下文
    3. 调用 LLM 识别商品名称
    4. 回填 item_name 到 state 和 chunks
    5. 生成商品名称的向量
    6. 保存到 Milvus
    """

    name = "item_name_recognition"

    def process(self, state: ImportGraphState) -> ImportGraphState:
        """执行商品名称识别"""
        config = get_config()

        # Step 1: 验证输入
        file_title, chunks = self._validate_inputs(state)

        # Step 2: 构造识别上下文
        context = self._build_context(chunks, config.item_name_chunk_k)

        # Step 3: 调用 LLM 识别
        item_name = self._recognize_item_name(file_title, context, config)

        # Step 4: 回填到 state 和 chunks
        self._backfill_item_name(state, chunks, item_name)

        # Step 5: 生成向量
        dense_vector, sparse_vector = self._generate_vectors(item_name)

        # Step 6: 保存到 Milvus
        self._save_to_milvus(state, file_title, item_name, dense_vector, sparse_vector, config)

        return state

    def _validate_inputs(self, state: ImportGraphState) -> Tuple[str, List[dict]]:
        """验证输入"""
        self.log_step("step_1", "验证输入")

        file_title = state.get("file_title", "")
        chunks = state.get("chunks", [])

        if not file_title:
            raise ValidationError("file_title 为空", node_name=self.name)

        if not isinstance(chunks, list) or not chunks:
            raise ValidationError("chunks 为空或无效", node_name=self.name)

        self.logger.info(f"文件标题: {file_title}, 切片数: {len(chunks)}")
        return file_title, chunks

    def _build_context(self, chunks: List[dict], k: int, max_chars: int = 2500) -> str:
        """构造识别上下文"""
        self.log_step("step_2", "构造识别上下文")

        parts = []
        total = 0

        for i, chunk in enumerate(chunks[:k]):
            if not isinstance(chunk, dict):
                continue

            title = (chunk.get("title") or "").strip()
            content = (chunk.get("content") or "").strip()

            if not (title or content):
                continue

            # 截断过长内容
            if len(content) > 800:
                content = content[:800] + "..."

            piece = f"【切片{i + 1}】\n标题:{title}\n内容:{content}"
            parts.append(piece)
            total += len(piece)

            if total >= max_chars:
                break

        return "\n\n".join(parts)[:max_chars]

    def _recognize_item_name(self, file_title: str, context: str, config) -> str:
        """调用 LLM 识别商品名称"""
        self.log_step("step_3", "调用 LLM 识别")

        prompt = f"""
请从以下信息中识别出商品名称与型号:
文件名:{file_title}

正文切片(用于辅助识别):
{context}

要求:
1. 返回内容为字符串形式,最好是带品牌、型号和名称的完整商品名称。比如:苏伯尓5000W大功率电磁炉;
2. 返回结果应该只包含商品名称,不要添加任何解释或其他内容;
3. 如果无法识别商品名称,请返回空字符串。
"""

        try:
            llm = get_llm_client(model=config.item_model, json_mode=False)
            resp = llm.invoke([
                SystemMessage(content="你是商品识别专家,只输出字符串。"),
                HumanMessage(content=prompt),
            ])

            item_name = getattr(resp, "content", "").strip()

            if not item_name:
                self.logger.warning("LLM 未能识别商品名称,使用文件标题")
                item_name = file_title

            self.logger.info(f"识别结果: {item_name}")
            return item_name

        except Exception as e:
            self.logger.warning(f"LLM 调用失败: {e},使用文件标题作为商品名称")
            return file_title

    def _backfill_item_name(self, state: ImportGraphState, chunks: List[dict], item_name: str):
        """回填 item_name 到 state 和 chunks"""
        self.log_step("step_4", "回填 item_name")

        state["item_name"] = item_name

        for chunk in chunks:
            chunk["item_name"] = item_name

        state["chunks"] = chunks

    def _generate_vectors(self, item_name: str) -> Tuple[Optional[List[float]], Optional[dict]]:
        """生成向量"""
        self.log_step("step_5", "生成向量")

        try:
            bge_m3_ef = get_bge_m3_model()
            vectors = bge_m3_ef.encode_documents([item_name])

            if vectors:
                dense_vector = vectors["dense"][0].tolist()

                # 提取稀疏向量
                start_idx = vectors["sparse"].indptr[0]
                end_idx = vectors["sparse"].indptr[1]
                token_ids = vectors["sparse"].indices[start_idx:end_idx].tolist()
                weights = vectors["sparse"].data[start_idx:end_idx].tolist()
                sparse_vector = dict(zip(token_ids, weights))

                self.logger.info("向量生成成功")
                return dense_vector, sparse_vector

        except Exception as e:
            self.logger.warning(f"向量生成失败: {e}")

        return None, None

    def _save_to_milvus(
            self,
            state: ImportGraphState,
            file_title: str,
            item_name: str,
            dense_vector: Optional[List[float]],
            sparse_vector: Optional[dict],
            config
    ):
        """保存到 Milvus"""
        self.log_step("step_6", "保存到 Milvus")

        if not config.milvus_url or not config.item_name_collection:
            self.logger.warning("Milvus 配置不完整,跳过保存")
            return

        try:
            # 1. 获取 Milvus 客户端
            client = get_milvus_client()

            # 2. 获取集合名字
            collection_name = "item_name_collection_test"

            # 3. 检查并创建集合
            if not client.has_collection(collection_name=collection_name):
                self._create_item_name_collection(client, collection_name)

            # 4. 准备数据
            data = {
                "file_title": file_title,
                "item_name": item_name
            }

            # 5. 构建稠密向量
            if dense_vector is not None:
                data["dense_vector"] = dense_vector

            # 6. 构建稀疏向量
            if sparse_vector is not None:
                data["sparse_vector"] = normalize_sparse_vector(sparse_vector)

            # 7. 插入数据
            result = client.insert(collection_name=collection_name, data=[data])
            self.logger.info(f"已保存到 Milvus,ID: {result['ids'][0]}")

            state["item_name"] = item_name

        except Exception as e:
            self.logger.warning(f"Milvus 保存失败: {e}")

    def _create_item_name_collection(self, client, collection_name: str):
        """创建 item_name 集合"""
        self.logger.info(f"创建集合: {collection_name}")

        # 1. 定义字段
        schema = client.create_schema(enable_dynamic_fields=True)

        schema.add_field(field_name="pk", datatype=DataType.VARCHAR,
                         is_primary=True, auto_id=True, max_length=100)
        schema.add_field(field_name="file_title", datatype=DataType.VARCHAR, max_length=65535)
        schema.add_field(field_name="item_name", datatype=DataType.VARCHAR, max_length=65535)
        schema.add_field(field_name="dense_vector", datatype=DataType.FLOAT_VECTOR, dim=1024)
        schema.add_field(field_name="sparse_vector", datatype=DataType.SPARSE_FLOAT_VECTOR)

        # 2. 创建索引
        index_params = client.prepare_index_params()
        index_params.add_index(
            field_name="dense_vector",
            index_name="dense_vector_index",
            index_type="AUTOINDEX",
            metric_type="IP"
        )
        index_params.add_index(
            field_name="sparse_vector",
            index_name="sparse_inverted_index",
            index_type="SPARSE_INVERTED_INDEX",
            metric_type="IP"
        )

        # 3. 创建集合
        client.create_collection(
            collection_name=collection_name,
            schema=schema,
            index_params=index_params
        )
        self.logger.info(f"集合 {collection_name} 创建成功")


# ================================================================== #
#                        兼容 & 测试                                   #
# ================================================================== #

# 兼容原有调用方式
node_item_name_recognition = ItemNameRecognitionNode()5. 测试运行
5.1 测试代码
if __name__ == '__main__':
    """
    商品名识别节点测试

    测试不同场景下的商品名识别逻辑
    """
    import json
    import os

    from knowledge.processor.import_process.base import setup_logging
    from knowledge.processor.import_process.nodes.item_name_recognition import node_item_name_recognition

    # 1. 开启日志
    setup_logging()

    print("=" * 60)
    print("ItemNameRecognitionNode 节点测试")
    print("=" * 60)

    # -------------------- 测试用例 1: 从 chunks.json 加载 -------------------- #
    print("\n--- 测试用例 1: 从 chunks.json 加载并识别 ---")

    # 获取临时目录
    temp_dir = r"D:\develop\develop\workspace\pycharm\usage\shopkeeper_brain_v260213\knowledge\processor\import_process\temp"
    chunk_json_input_path = os.path.join(temp_dir, "chunks.json")

    # 检查文件是否存在
    if os.path.exists(chunk_json_input_path):
        with open(chunk_json_input_path, "r", encoding="utf-8") as f:
            chunk_list = json.load(f)

        # 构建 state 状态
        state = {
            "file_title": "万用表的使用",
            "chunks": chunk_list
        }

        # 调用处理方法
        result = node_item_name_recognition.process(state)

        print(f"\n识别结果:")
        print(f"  item_name: {result.get('item_name', '未识别')}")
        print(f"  chunks 数量: {len(result.get('chunks', []))}")

        # 检查 chunks 是否已回填 item_name
        if result.get("chunks"):
            first_chunk = result["chunks"][0]
            print(f"  首个 chunk 的 item_name: {first_chunk.get('item_name', '未回填')}")

        # 备份结果
        os.makedirs(temp_dir, exist_ok=True)
        output_path = os.path.join(temp_dir, "chunks_item_name.json")
        with open(output_path, "w", encoding="utf-8") as f:
            json.dump(result, f, ensure_ascii=False, indent=2)
        print(f"  已备份到: {output_path}")

    else:
        print(f"    chunks.json 文件不存在: {chunk_json_input_path}")
        print("  请先运行 document_split 节点生成 chunks.json")

    # -------------------- 测试用例 2: 使用模拟数据 -------------------- #
    print("\n\n--- 测试用例 2: 使用模拟数据 ---")

    mock_chunks = [
        {
            "title": "# 福禄克 15B+ 数字万用表",
            "content": "福禄克 15B+ 是一款专业级数字万用表,适用于电子工程师和技术人员。\n\n主要特点:\n- 自动量程\n- 高精度测量\n- 坚固耐用",
            "file_title": "万用表说明书"
        },
        {
            "title": "## 产品规格",
            "content": "直流电压:0.1mV - 600V\n交流电压:0.1mV - 600V\n电阻:0.1Ω - 40MΩ",
            "file_title": "万用表说明书"
        },
        {
            "title": "## 安全须知",
            "content": "使用前请仔细阅读本手册。不要测量超过额定值的电压。",
            "file_title": "万用表说明书"
        }
    ]

    mock_state = {
        "file_title": "万用表说明书",
        "chunks": mock_chunks
    }

    mock_result = node_item_name_recognition.process(mock_state)

    print(f"识别结果:")
    print(f"  item_name: {mock_result.get('item_name', '未识别')}")

    # -------------------- 测试用例 3: 空 chunks -------------------- #
    print("\n\n--- 测试用例 3: 空 chunks (预期抛出异常) ---")

    try:
        empty_state = {
            "file_title": "测试文件",
            "chunks": []
        }
        node_item_name_recognition.process(empty_state)
    except Exception as e:
        print(f"捕获到预期异常: {e}")

    # -------------------- 测试用例 4: 缺少 file_title -------------------- #
    print("\n\n--- 测试用例 4: 缺少 file_title (预期抛出异常) ---")

    try:
        no_title_state = {
            "file_title": "",
            "chunks": mock_chunks
        }
        node_item_name_recognition.process(no_title_state)
    except Exception as e:
        print(f"捕获到预期异常: {e}")

    print("\n" + "=" * 60)
    print("测试完成")
print("=" * 60)5.2 运行测试
# 进入项目目录
cd knowledge

# 激活虚拟环境
.venv\Scripts\activate

# 运行测试
python -m knowledge.processor.import_process.nodes.item_name_recognition5.3 预期输出
============================================================
ItemNameRecognitionNode 节点测试
============================================================

--- 测试用例 1: 从 chunks.json 加载并识别 ---
2026-02-23 10:00:00 - import.item_name_recognition - INFO - --- item_name_recognition 开始 ---
2026-02-23 10:00:00 - import.item_name_recognition - INFO - [step_1] 验证输入
2026-02-23 10:00:00 - import.item_name_recognition - INFO - 文件标题: 万用表的使用, 切片数: 5
2026-02-23 10:00:00 - import.item_name_recognition - INFO - [step_2] 构造识别上下文
2026-02-23 10:00:00 - import.item_name_recognition - INFO - [step_3] 调用 LLM 识别
2026-02-23 10:00:01 - import.item_name_recognition - INFO - 识别结果: 福禄克15B+数字万用表
2026-02-23 10:00:01 - import.item_name_recognition - INFO - [step_4] 回填 item_name
2026-02-23 10:00:01 - import.item_name_recognition - INFO - [step_5] 生成向量
2026-02-23 10:00:02 - import.item_name_recognition - INFO - 向量生成成功
2026-02-23 10:00:02 - import.item_name_recognition - INFO - [step_6] 保存到 Milvus
2026-02-23 10:00:02 - import.item_name_recognition - INFO - 已保存到 Milvus,ID: 449234567890123456
2026-02-23 10:00:02 - import.item_name_recognition - INFO - --- item_name_recognition 完成 ---

识别结果:
  item_name: 福禄克15B+数字万用表
  chunks 数量: 5
  首个 chunk 的 item_name: 福禄克15B+数字万用表
  已备份到: D:\...\temp\chunks_item_name.json


--- 测试用例 2: 使用模拟数据 ---
...
识别结果:
  item_name: 福禄克15B+数字万用表


--- 测试用例 3: 空 chunks (预期抛出异常) ---
捕获到预期异常: [item_name_recognition] chunks 为空或无效


--- 测试用例 4: 缺少 file_title (预期抛出异常) ---
捕获到预期异常: [item_name_recognition] file_title 为空

============================================================
测试完成
============================================================6. 总结
6.1 节点功能概览
| 功能模块 | 说明 |
|---|---|
| 输入验证 | 检查 file_title 和 chunks 的有效性 |
| 上下文构造 | 从前 K 个切片提取关键信息供 LLM 识别 |
| LLM 识别 | 调用大语言模型从文本中提取商品名称 |
| 状态回填 | 将识别结果写入 state 和每个 chunk |
| 向量生成 | 使用 BGE-M3 生成混合嵌入(稠密 + 稀疏) |
| Milvus 存储 | 创建集合并持久化商品名向量 |
6.2 设计要点
LLM Prompt 设计
- 明确输入格式(文件名 + 切片)
- 明确输出格式(只返回商品名称)
- 提供示例引导模型理解
优雅降级
- LLM 调用失败 → 使用文件标题
- 向量生成失败 → 跳过 Milvus 存储
- 确保流程不会因单点故障中断
混合嵌入
- 稠密向量捕捉语义相似性
- 稀疏向量保留关键词匹配
- 两者结合提升检索准确率
集合自动创建
- 首次运行时自动创建 Schema 和索引
- 简化部署流程,无需预先建表
企业痛点映射
| 痛点 | 传统方案 | AI Agent 商品名识别方案 | 效率提升 |
|---|---|---|---|
| 手动为文档打标签 | 人工阅读每份文档,提取商品名称 | LLM 自动从切片中提取商品名 | 每份文档从 5min 降至 ~5s |
| 商品名无法被模糊搜索 | 只能搜文件名 | 稠密向量(语义)+ 稀疏向量(关键词)混合检索 | 搜索召回率提升 ~50%(预估) |
| 向量数据库无 Schema | 纯向量存储,无法过滤属性 | Milvus Schema 定义 + 字段索引 | 支持按 file_title 等字段过滤 |
| 非结构化文本难提取型号 | 靠人眼找 "福禄克15B+" 这种型号 | LLM Prompt 带品牌型号要求 | 型号提取准确率 ~80%+(预估) |
| 单点故障导致全流程中断 | LLM 挂了任务就废了 | 3 级降级:LLM→file_title / 向量→跳过 / Milvus→跳过 | 流程可用性 ~99% |
Remote & Agent 应用场景价值
Remote 场景价值:BGE-M3 模型和 Milvus 服务都部署在远程服务器上,团队成员通过统一的
.env配置(BGE_M3_PATH/MILVUS_URL)即可连接。LLM 调用依赖统一的 API Key,无需本地 GPU。Agent 落地场景:ItemNameRecognitionNode 可封装为"商品名提取 Agent"——Agent 接收 chunks → 调用 LLM 提取商品名 → 生成向量 → 写入 Milvus。Prompt 模板可作为 Agent 的 "tool description",让用户自定义识别规则(如"只识别生鲜类商品名")。
Git Commit 对应
本节商品名识别节点对应的提交记录(参考值,以实际版本为准):
<待补充 — 建议在项目仓库中搜索 "item_name_recognition.py" 相关提交>cd shopkeeper_brain
# 查看商品名识别相关代码
git log --oneline --all -- knowledge/processor/import_process/nodes/item_name_recognition.py